Optimizing Bitmaps
Typically, your largest resources are bitmaps: PNGs, JPEGs, etc. If you can remove some — such as through the techniques in the preceding sections — that is great! For those that remain, though, you still have some options for making them take less space than they do presently.
Switch to Vectors
You may be able to replace some of those bitmaps with vector drawables, the ones we used in this book for toolbar button icons.
For example, you may get bitmaps to put in your app from a graphic designer. If the graphic designer can supply you with an SVG image instead, you can use the Vector Asset wizard to try converting that SVG to a vector drawable. If that drawable looks good, you can remove the bitmaps.
A vector drawable on its own typically is smaller than an equivalent PNG file. And a vector drawable is density-independent, so you only need one such drawable to get good results on all screen densities. With bitmaps, you might have multiple images in multiple drawable directories (e.g., res/drawable-hdpi/, res/drawable-xhdpi/). Replacing several bitmaps with a single vector drawable should result in a substantial reduction in your APK size.
However, do not try swapping your launcher icon mipmap with a vector drawable, as not all launcher apps are set up to handle that.
Reduce Resolution
The biggest bitmaps of all tend to be photographs. Modern cameras offer very high resolution, and high-resolution photos take up a lot of disk space.
Moreover, you may not need all of that resolution. For example, it may be that you only ever show the image as a thumbnail. In that case, you do not need a 20-megapixel photo — you could safely reduce the resolution to be a few hundred pixels on a side, rather than a few thousand. This will substantially reduce the size of those images.
Convert to WebP
Several years ago, Google introduced the WebP image format. This format uses a flexible compression algorithm that supports both lossless compression (like PNG) and lossy compression (like JPEG). A WebP image may be somewhat smaller than its PNG or JPEG counterpart.
If you right-click over a PNG or JPEG image in your project, you can choose “Convert to WebP…” from the context menu. This will bring up a dialog to configure the conversion:
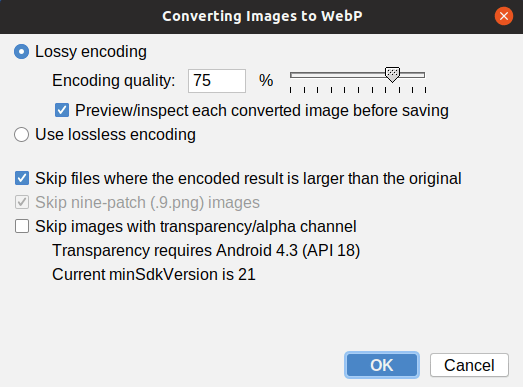
If the image is similar to a photo, you should choose “Lossy encoding”. If the image is an icon or other types of “line art”, choose “Lossless encoding”. If you have “Skip files where the encoded result is larger than the original” checked, you are assured that you will only get a WebP image from the conversion if that image will reduce your APK size. The “Skip images with transparency/alpha channel” usually can be unchecked, as this only affects apps that support Android 4.2 and older devices.
If you chose “Lossy Encoding”, there is a checkbox to ask for a preview of the changes. If you choose that, you will get a preview window showing the original image and the WebP converted image, so you can see how they compare:
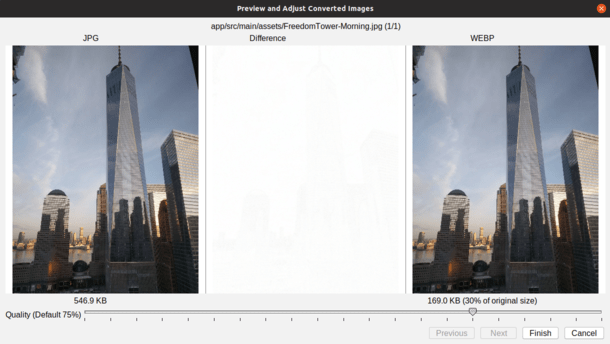
Here, with a 75% WebP quality factor, we wind up with an image that is only 30% the size of the original, with acceptable quality. The “difference” area in the center shows a comparison of what pixels changed between the images, and by how much. A very low quality factor starts making more significant changes to the image, for example:
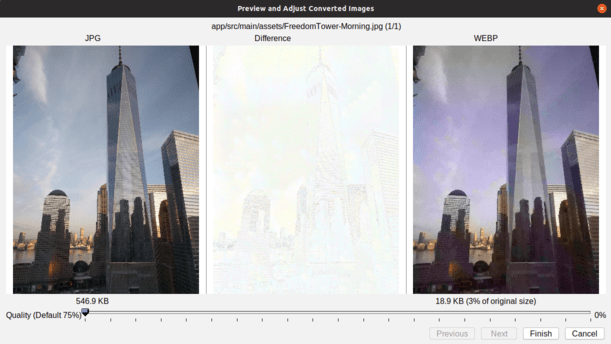
(if you look very closely at that middle area, you will see some pixels showing up)
Once you “Finish” the WebP conversion wizard, your image will be converted to WebP (only if actually reduce the size, if you checked that one checkbox).
Crunch Your PNGs and JPEGs
If you would prefer to keep your PNGs and JPEGs in their original form, rather than convert them to WebP, there are a variety of tools available to “crunch” them down to take up less space. pngquant, jpegoptim, optipng, and others are available for use from the command line. Web-based equivalents also exist. There are even Gradle plugins that can automate the process.
Remove Densities
In principle, you could use resConfigs to limit the densities that you support, just as you use it to limit the languages that you support. If you try this, you will want to test your app on a variety of screen densities and ensure that your images still look OK.
Prev Table of Contents Next
This book is licensed under the Creative Commons Attribution-ShareAlike 4.0 International license.