Creating a Library Module
Adding a library module to an existing project — whether the project was created using the new-project wizard or was imported from elsewhere — is fairly easy.
Using the Android Studio Wizard
From the Android Studio main menu, you can choose “File” > “New” > “New Module” to start a new-module wizard. Functionally, this works like the new-project wizard, though the UI is a bit different.
We start off with a list of templates on the left and details for the chosen template on the right:
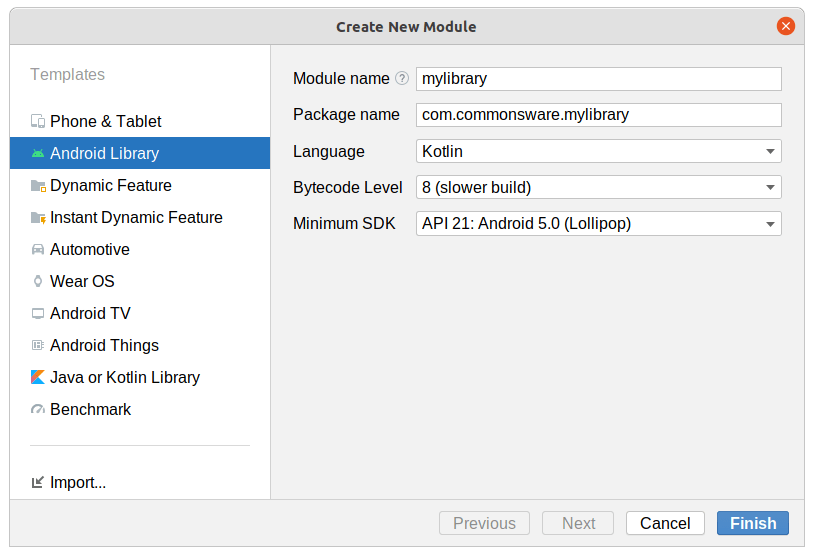
The “Module name” field lets you give a name to the library. This will be the directory that is created off of the project root for the contents of the module. “Package name”, “Language”, and “Minimum SDK” are the same as their equivalents in the new-project wizard. “Bytecode Level” refers to the Java language versions supported by the library — you almost always want to choose the default value here.
Then, you can click “Finish”, and Android Studio will set up your new library module.
Reviewing What You Get
The exact details of what you get will vary by module template, language choice, and other settings in the new-module wizard. But, by and large, a library module will look a lot like your app module, in terms of general structure. It will have its own source sets, such as main, where you can put your Java/Kotlin code, your resources, your manifest, etc. It will have its own source sets for tests. And it will have a build.gradle file.
The big thing that distinguishes a library module from an application module is a choice of plugin.
In an application module, the module’s build.gradle file will pull in the com.android.application module:
plugins {
  id 'com.android.application'
  id 'kotlin-android'
}
In an Android library module, this will be com.android.library instead:
plugins {
  id 'com.android.library'
  id 'kotlin-android'
}
This teaches Gradle that we are building a library, not an app.
In addition, there will be one more change: to the settings.gradle file in the project root directory. The primary purpose of this file is to list all of the modules in the project. Android Studio’s new-module wizard helpfully adds an entry to settings.gradle for you:
rootProject.name = "My Application"
include ':app'
include ':mylibrary'
The leading-colon syntax says “this module is located directly off of the project root directory”.
Adding Your Own Stuff
From here, you can add your own code, resources, and anything else that you need, just like you would have in your app module. If you then have your app module depend upon the library (via implementation project(":mylibrary") or whatever), the things that you put into the library will be available in your app module. For example, the Utilities library module in the Kotlin sample project contains ViewBindingFragment, and other app modules depend upon Utilities to be able to reference that class.
Pondering implementation Versus api
There are some features that let you control what elements of the library module are accessible by modules that depend upon that library. Back in the chapter on modules, we mentioned one: the use of the internal visibility keyword in Kotlin. internal things are visible within a library module but are treated as private by other modules that depend upon the library. You can decide what classes, functions, etc. are part of the library’s API and mark the rest as internal or private.
A library can have its own dependencies, via the same sort of dependencies closure in build.gradle that an app module can have. However, akin to public versus internal in Kotlin, you have a choice for declaring dependencies in Gradle: api and implementation:
-
implementationsays “use this dependency in this module, but do not expose its contents to modules that depend upon this one” -
apisays “use this dependency in this module, and also allow modules that depend upon this one to use its contents”
In other words: is this dependency itself part of your module’s API (api), or is it part of your module’s implementation (implementation). api is like having a public element in Kotlin: it is part of your API. implementation is like having an internal element in Kotlin: it is part of your module’s implementation, but other modules should not get that specific dependency as a “transitive dependency”.
Prev Table of Contents Next
This book is licensed under the Creative Commons Attribution-ShareAlike 4.0 International license.