A Navigation-ized To-Do List
The FragmentNav sample module in the Sampler and SamplerJ projects mostly is a clone of last chapter’s FragmentManual module. In this edition of the app, though, we use the Navigation component to get between the ListFragment and the DisplayFragment. We also switch to using a Toolbar here for our app bar, so we can get the up button added for us when we are on the DisplayFragment.
The Dependencies
The Navigation component is relatively complex in terms of dependencies, as we have variations for Java and Kotlin plus additional setup for the Safe Args feature.
The Basics
There are two main dependencies that most apps will use to employ the Navigation component:
-
androidx.navigation:navigation-fragmentprovides the core support for navigation, particularly using fragments -
androidx.navigation:navigation-uioffers the integration with theToolbarand other forms of app bar
These dependencies are closely coupled and generally will need to have the same version. So, the overall Sampler/SamplerJ projects define a nav_version constant that contains the version to use:
buildscript {
    ext.nav_version = "2.3.5"

    repositories {
        google()
        jcenter()
    }

    dependencies {
        classpath 'com.android.tools.build:gradle:7.0.2'
        classpath "androidx.navigation:navigation-safe-args-gradle-plugin:$nav_version"
    }
}
That way, when we add the dependencies in our FragmentNav module, we can reference that nav_version constant and ensure that everything stays synchronized:
  implementation "androidx.navigation:navigation-fragment:$nav_version"
  implementation "androidx.navigation:navigation-ui:$nav_version"
Groovy — the language used for these Gradle scripts — supports string interpolation, using the same basic syntax as does Kotlin ($name to add the value of name to the string). As a result, values like androidx.navigation:navigation-fragment:$nav_version get the $nav_version portion replaced by whatever the value of nav_version is.
The KTX Bits
The dependencies closure shown above is from the SamplerJ project. Both Java and Kotlin projects are welcome to use those dependencies. Kotlin projects, though, are more likely to use the Android KTX variants of the dependencies:
  implementation "androidx.navigation:navigation-fragment-ktx:$nav_version"
  implementation "androidx.navigation:navigation-ui-ktx:$nav_version"
These, like the rest of the Android KTX libraries, add some extension functions and similar Kotlin features that make using the Navigation component easier in Kotlin.
The Safe Args Code Generator
For basic use of the Navigation component, those are all that you need. If you want to use the Safe Args feature for type-safe data exchange as part of navigation, you have some additional setup to perform.
Let’s review one of the earlier code snippets, where we defined nav_version:
buildscript {
    ext.nav_version = "2.3.5"

    repositories {
        google()
        jcenter()
    }

    dependencies {
        classpath 'com.android.tools.build:gradle:7.0.2'
        classpath "androidx.navigation:navigation-safe-args-gradle-plugin:$nav_version"
    }
}
If you look closely, this also adds another entry to the buildscript set of dependencies. Specifically, this adds a Gradle plugin for Safe Args. dependencies in a module usually refer to code added to that module for runtime use; dependencies in the buildscript closure usually refer to Gradle plugins that will be used by modules.
Simply having the classpath entry is insufficient, though. Modules need to opt into specific plugins offered by the library indicated by the classpath entry. So, our Java modules’ build.gradle files have two apply plugin statements at the top: one for Android apps and one for Safe Args:
apply plugin: 'com.android.application'
apply plugin: 'androidx.navigation.safeargs'
Kotlin modules will have additional plugins for Kotlin support, along with a Kotlin-specific version of the Safe Args plugin:
apply plugin: 'com.android.application'
apply plugin: 'kotlin-android'
apply plugin: 'kotlin-parcelize'
apply plugin: 'androidx.navigation.safeargs.kotlin'
apply plugin: 'kotlin-kapt'
The Navigation Resource
The module has a res/navigation/ directory for navigation resources. In there, there is a main_nav_graph.xml resource that represents our tiny navigation graph:
<?xml version="1.0" encoding="utf-8"?>
<navigation android:id="@+id/main_nav_graph"
  xmlns:android="http://schemas.android.com/apk/res/android"
  xmlns:app="http://schemas.android.com/apk/res-auto"
  app:startDestination="@id/listFragment">

  <fragment
    android:id="@+id/listFragment"
    android:name="com.commonsware.jetpack.sampler.nav.ListFragment"
    android:label="ToDo Items">
    <action
      android:id="@+id/displayModel"
      app:destination="@id/displayFragment" />
  </fragment>
  <fragment
    android:id="@+id/displayFragment"
    android:name="com.commonsware.jetpack.sampler.nav.DisplayFragment"
    android:label="ToDo Item">
    <argument
      android:name="modelId"
      app:argType="string" />
  </fragment>
</navigation>listFragment
There are two <fragment> elements set up as destinations in this resource. One is listFragment, pointing to our ListFragment class:
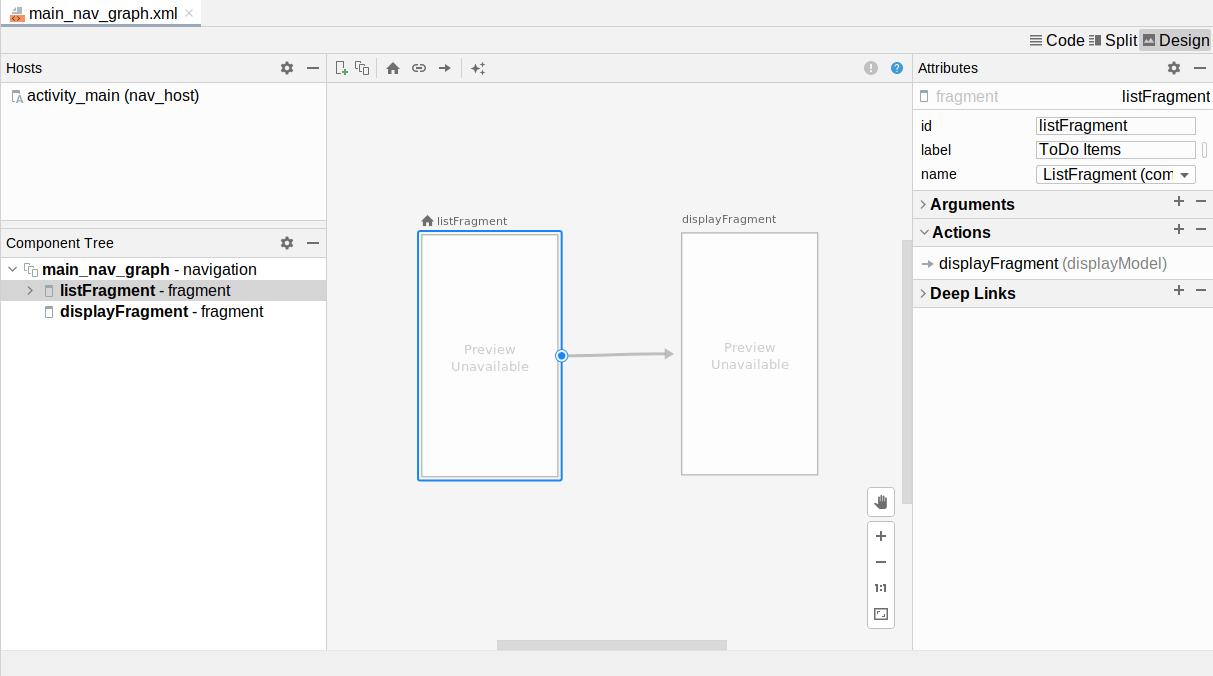
listFragment
It contains an <action> child element, identifying that this destination can navigate to the displayFragment destination. The action’s ID is displayModel, and that is what we can use in our Java/Kotlin code to request to perform this action.
Clicking the action’s arrow in the graphic designer shows the details of that action in the “Attributes” pane:
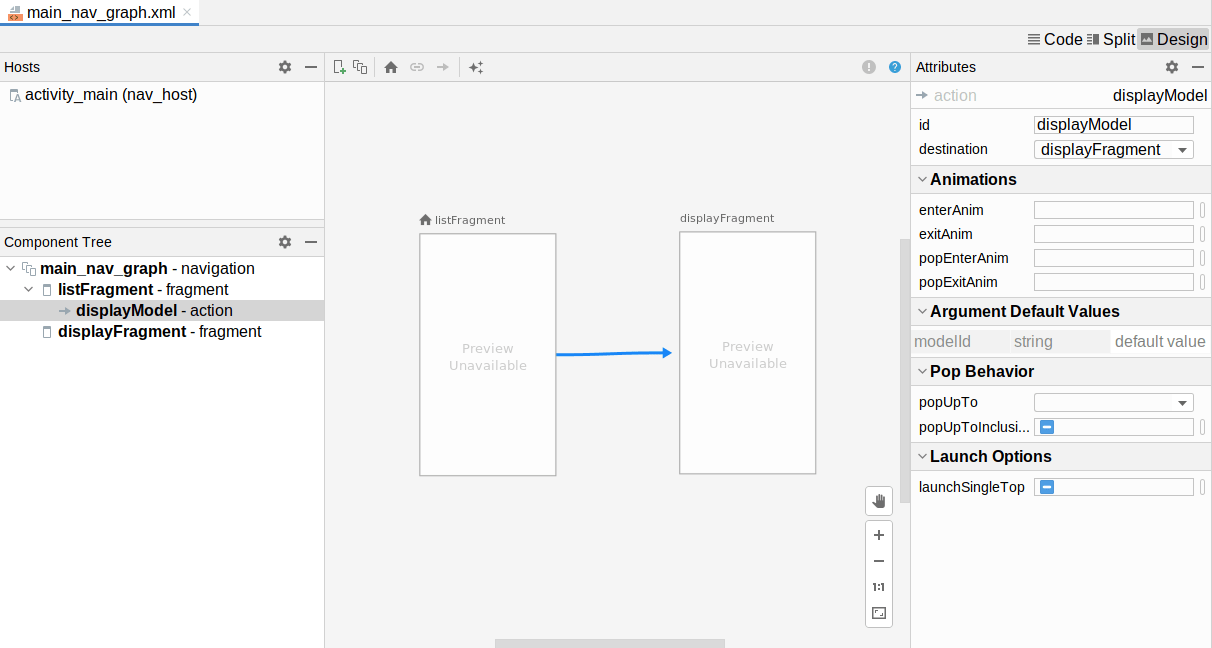
displayModel
The app:startDestination attribute in the root <navigation> element points to this listFragment destination, meaning that when we first use this navigation graph, the ListFragment is what should be displayed.
displayFragment
The other <fragment> element is for displayFragment:
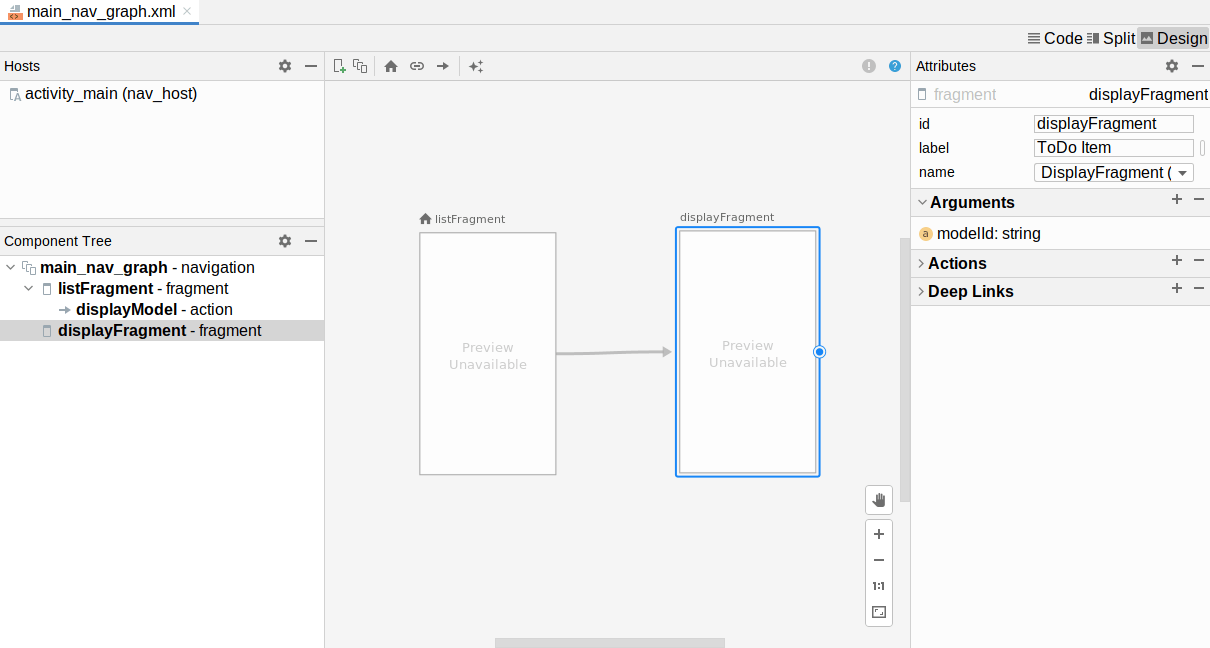
displayFragment
This contains an <argument> child element, stating that this destination expects to receive a modelId String value.
The Activity Layout
In the FragmentManual sample, we did not need an activity layout. We just used the existing android.R.id.content container as a target for our FragmentTransaction requests.
With the Navigation component, usually you will need a layout resource, particularly one where you place the NavHostFragment to say where the navigation graph’s <fragment> destinations should appear. So, FragmentNav has an activity_main layout resource that does just that:
<?xml version="1.0" encoding="utf-8"?>
<androidx.constraintlayout.widget.ConstraintLayout
  xmlns:android="http://schemas.android.com/apk/res/android"
  xmlns:app="http://schemas.android.com/apk/res-auto"
  xmlns:tools="http://schemas.android.com/tools"
  android:layout_width="match_parent"
  android:layout_height="match_parent"
  tools:context=".MainActivity">

  <androidx.appcompat.widget.Toolbar
    android:id="@+id/toolbar"
    android:layout_width="0dp"
    android:layout_height="wrap_content"
    android:background="?attr/colorPrimary"
    app:layout_constraintEnd_toEndOf="parent"
    app:layout_constraintStart_toStartOf="parent"
    app:layout_constraintTop_toTopOf="parent"
    app:theme="?attr/actionBarPopupTheme" />

  <androidx.fragment.app.FragmentContainerView
    android:id="@+id/nav_host"
    android:name="androidx.navigation.fragment.NavHostFragment"
    android:layout_width="0dp"
    android:layout_height="0dp"
    app:defaultNavHost="true"
    app:layout_constraintBottom_toBottomOf="parent"
    app:layout_constraintEnd_toEndOf="parent"
    app:layout_constraintStart_toStartOf="parent"
    app:layout_constraintTop_toBottomOf="@id/toolbar"
    app:navGraph="@navigation/main_nav_graph" />
</androidx.constraintlayout.widget.ConstraintLayout>The NavHostFragment is added using a <FragmentContainerView> element in the layout XML. This is the modern way to add “static fragments”, ones that will be used all the time and cannot themselves be removed. The android:name attribute identifies the particular Fragment subclass to use, using the fully-qualified class name. In this case, we are not using one of our fragments, but instead are using NavHostFragment (or, more formally, androidx.navigation.fragment.NavHostFragment).
The NavHostFragment takes two main custom attributes in addition to the standard ones for sizing and positioning the fragment. app:navGraph supplies a reference to the navigation graph resource that this host will be using for its contents. app:defaultNavHost basically says “have the system’s BACK button route through this fragment’s navigation graph”, so BACK presses navigate backwards through the graph.
The layout also has a Toolbar to use as our app bar, with the NavHostFragment taking up the rest of the available space. As a result, this app uses Theme.AppCompat.Light.NoActionBar as a basis for its AppTheme style resource, to suppress the default action bar implementation, as we saw back in the chapter on the app bar.
MainActivity
Most of the FragmentNav app’s code is the same as its FragmentManual counterpart. We still have two fragments, each with its own viewmodel, with ToDoModel objects coming from a ToDoRepository. We also still have the same RecyclerView pieces for populating the list.
What differs is how our activity sets things up, how we navigate from the ListFragment to the DisplayFragment, and how we pass the ToDoModel ID between those fragments.
The FragmentManual edition of MainActivity conditionally executed a FragmentTransaction to bring up the ListFragment. The Navigation-enhanced MainActivity instead needs to initialize the Navigation component.
The Android KTX extensions for Kotlin cause the Java and Kotlin code to look somewhat different, even though in the end they do the same work:
- Obtain the
NavControllerassociated with ourNavHostFragment - Hook up that
NavControllerto ourToolbar, to automatically manage things like theToolbartitle and up button
Java
package com.commonsware.jetpack.samplerj.nav;

import android.os.Bundle;
import androidx.annotation.Nullable;
import androidx.appcompat.app.AppCompatActivity;
import androidx.navigation.NavController;
import androidx.navigation.fragment.NavHostFragment;
import androidx.navigation.ui.AppBarConfiguration;
import androidx.navigation.ui.NavigationUI;

public class MainActivity extends AppCompatActivity {
  @Override
  protected void onCreate(@Nullable Bundle savedInstanceState) {
    super.onCreate(savedInstanceState);
    setContentView(R.layout.activity_main);

    NavController nav =
      ((NavHostFragment)getSupportFragmentManager()
        .findFragmentById(R.id.nav_host))
        .getNavController();
    AppBarConfiguration appBarCfg =
      new AppBarConfiguration.Builder(nav.getGraph()).build();

    NavigationUI.setupWithNavController(findViewById(R.id.toolbar), nav,
      appBarCfg);
  }
}
In Java, to obtain the NavController, we:
- Get a
FragmentManagerviagetSupportFragmentManager() - Get the
NavHostFragmentfrom thatFragmentManagerviafindFragmentById() - Call
getNavController()on theNavHostFragment
After that, we:
- Ask the
NavControllerfor theNavGraphobject that represents the parsed navigation resource (getGraph()) - Pass that to an
AppBarConfiguration.Builderand use that to build anAppBarConfiguration - Pass that along with the
NavControllerand theToolbartoNavigationUI.setupWithNavController(), to have the Navigation component automatically manage the contents of theToolbar
Now, the Navigation component will fill in the Toolbar title from our destination label and handle the up button, as we navigate through the graph that we have set up for this NavHostFragment.
Kotlin
The Kotlin code does the same work, with less actual code:
package com.commonsware.jetpack.sampler.nav

import android.os.Bundle
import androidx.appcompat.app.AppCompatActivity
import androidx.navigation.fragment.findNavController
import androidx.navigation.ui.AppBarConfiguration
import androidx.navigation.ui.setupWithNavController
import com.commonsware.jetpack.sampler.nav.databinding.ActivityMainBinding

class MainActivity : AppCompatActivity() {

  override fun onCreate(savedInstanceState: Bundle?) {
    super.onCreate(savedInstanceState)

    val binding = ActivityMainBinding.inflate(layoutInflater)

    setContentView(binding.root)

    supportFragmentManager.findFragmentById(R.id.nav_host)?.findNavController()?.let { nav ->
      binding.toolbar.setupWithNavController(nav, AppBarConfiguration(nav.graph))
    }
  }
}
Android KTX gives us:
- A
findNavController()extension function forActivityandFragment, so we can get ourNavControllerjust by callingfindNavController()and providing the ID of theNavHostFragment; - A
setupWithNavController()extension function onToolbar, so we can add Navigation support for it more directly; and - A global
AppBarConfiguration()function that looks like a constructor, though it actually usesAppBarConfiguration.Builder“under the covers”
ListFragment
The change to ListFragment is in the navTo() function, as now we use the Navigation component instead of a FragmentTransaction to bring up the DetailFragment.
This app uses Safe Args, courtesy of the <argument> element in the navigation graph and the androidx.navigation.safeargs Gradle plugin. Hence, we get a ListFragmentDirections class code-generated for us. This class is named based on the initial destination (ListFragment) and has static methods for each of our actions that collect the arguments that we need to pass to the destination that we want to navigate to. Our action has displayModel as its ID, so ListFragmentDirections has a displayModel() method that we can call, either from Java:
  private void navTo(ToDoModel model) {
    NavHostFragment.findNavController(this)
      .navigate(ListFragmentDirections.displayModel(model.id));
  }
…or from Kotlin:
  private fun navTo(model: ToDoModel) {
    findNavController().navigate(ListFragmentDirections.displayModel(model.id))
  }
To navigate to a destination, we:
- Call
displayModel(), passing it ourToDoModelID as the argument, which gives us aNavDirectionsobject that encapsulates our action ID (displayModel) and arguments - Get our
NavControllerusing eitherNavHostFragment.findNavController()(in Java) or thefindNavController()extension function in Kotlin - Pass the
NavDirectionsto thenavigate()function on ourNavController
The Navigation component will then do whatever is necessary to take us to that destination, updating the Toolbar as needed.
DisplayFragment
The only change in DisplayFragment is how we get our ToDoModel ID. In FragmentManual, we used the arguments Bundle directly. In FragmentNav, we are using Safe Args, which gives us a code-generated DisplayFragmentArgs class. This class is named after our destination (DisplayFragment), knows how to obtain its arguments, and supplies them to us in type-safe functions, such as getModelId() for our modelId argument.
In Java, we get a DisplayFragmentArgs by calling the static fromBundle() method, providing it our arguments Bundle:
String modelId = DisplayFragmentArgs.fromBundle(getArguments()).getModelId();
From there, a call to getModelId() returns the ToDoModel ID that we supplied to ListFragmentDirections.displayModel().
In Kotlin, while you could do the same thing, you also have the navArgs() property delegate from Android KTX:
private val args: DisplayFragmentArgs by navArgs()
That knows how to get our arguments Bundle and set up our DisplayFragmentArgs instance, so we can just refer to its modelId property to get the ToDoModel ID:
val model = vm.getModel(args.modelId)
Prev Table of Contents Next
This book is licensed under the Creative Commons Attribution-ShareAlike 4.0 International license.