ToDo, or Not ToDo? That Is the Question
To see dynamic fragments in action, let’s turn to the FragmentManual sample module in the Sampler and SamplerJ projects.
This sample app is relatively complicated. We have:
- One activity
- Two fragments
- Two viewmodels
- A
RecyclerView - A few layout resources
- And other stuff besides
What We’re Building
The sample app implements a to-do list, showing a list of to-do items along with details of an individual item.
This code mimics some of the code from Exploring Android, though with a number of differences, to illustrate the manual use of dynamic fragments.
From the user’s standpoint, launching the app brings up a list of to-do items, where the list of things to do is hard-coded in the app:
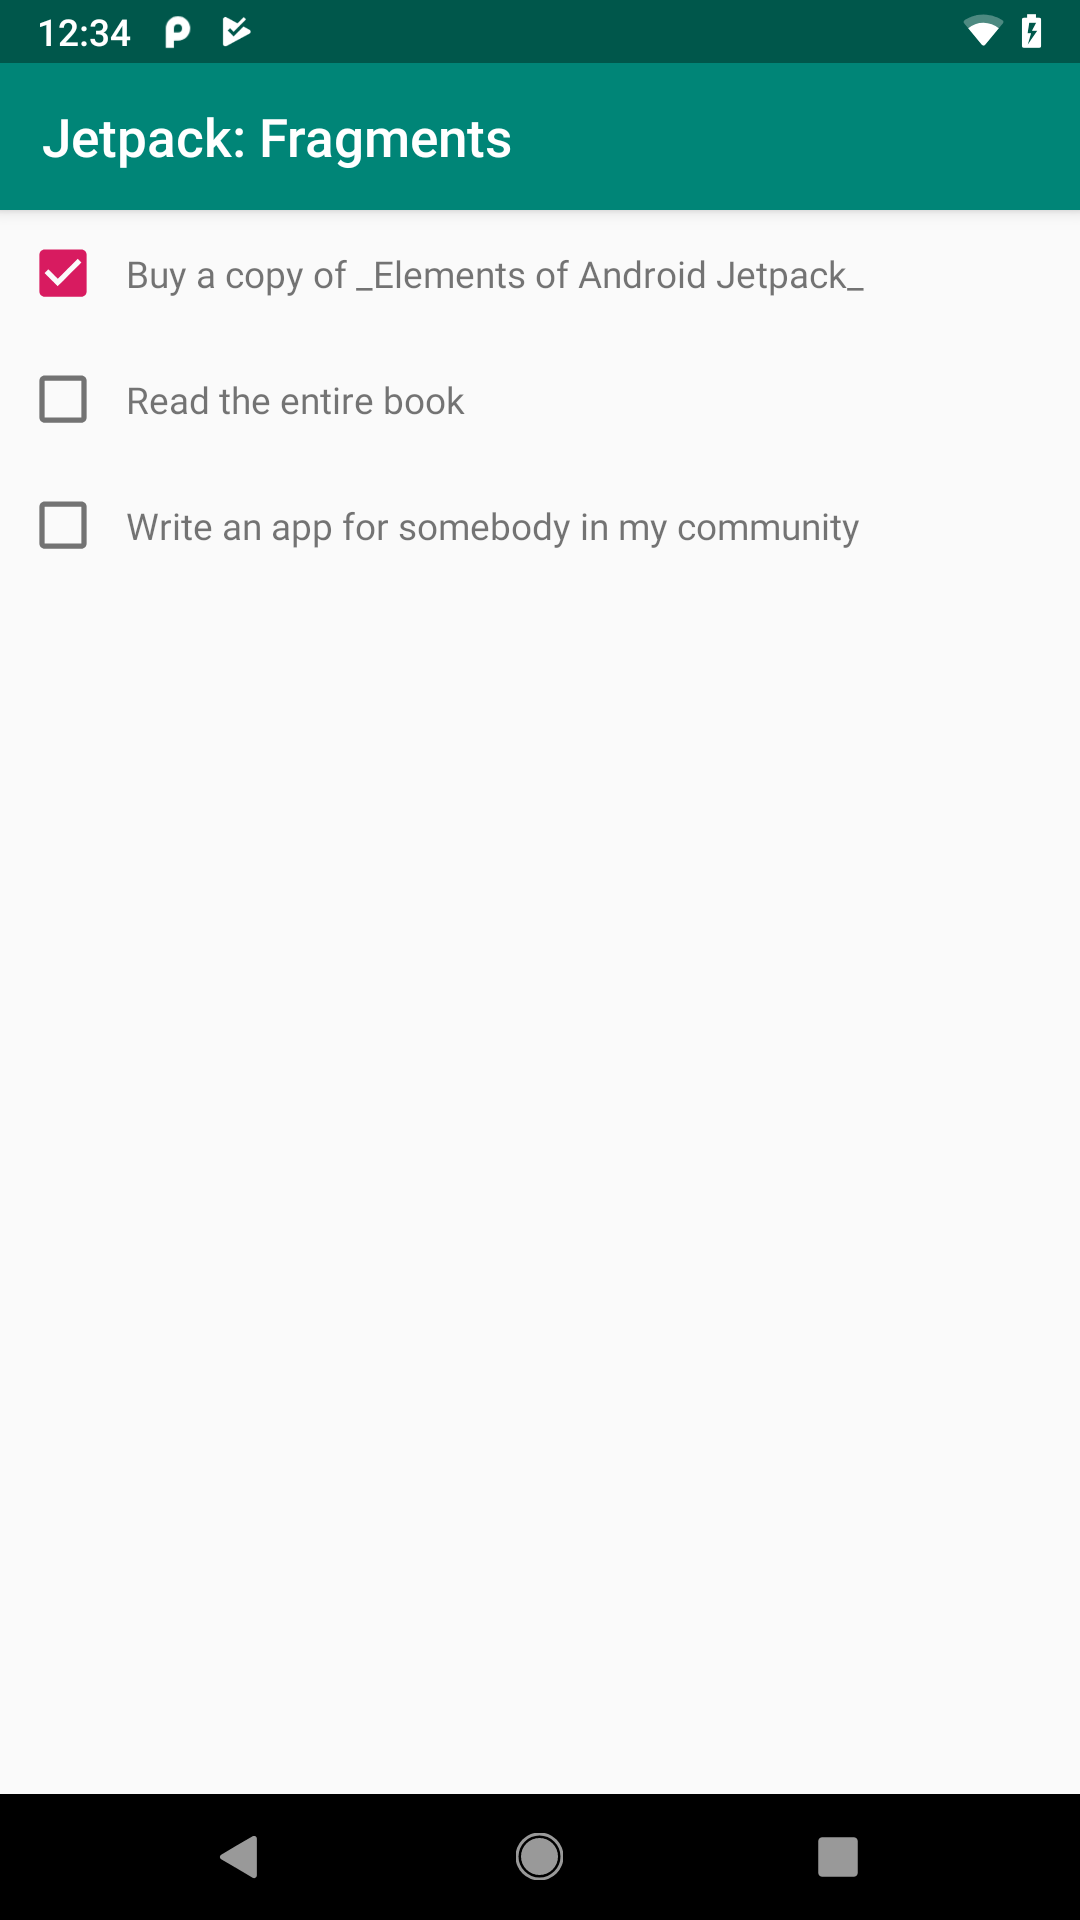
FragmentManual Sample App, As Initially Launched
Tapping on the description of an item brings up additional details, including the creation date and, in some cases, some notes:
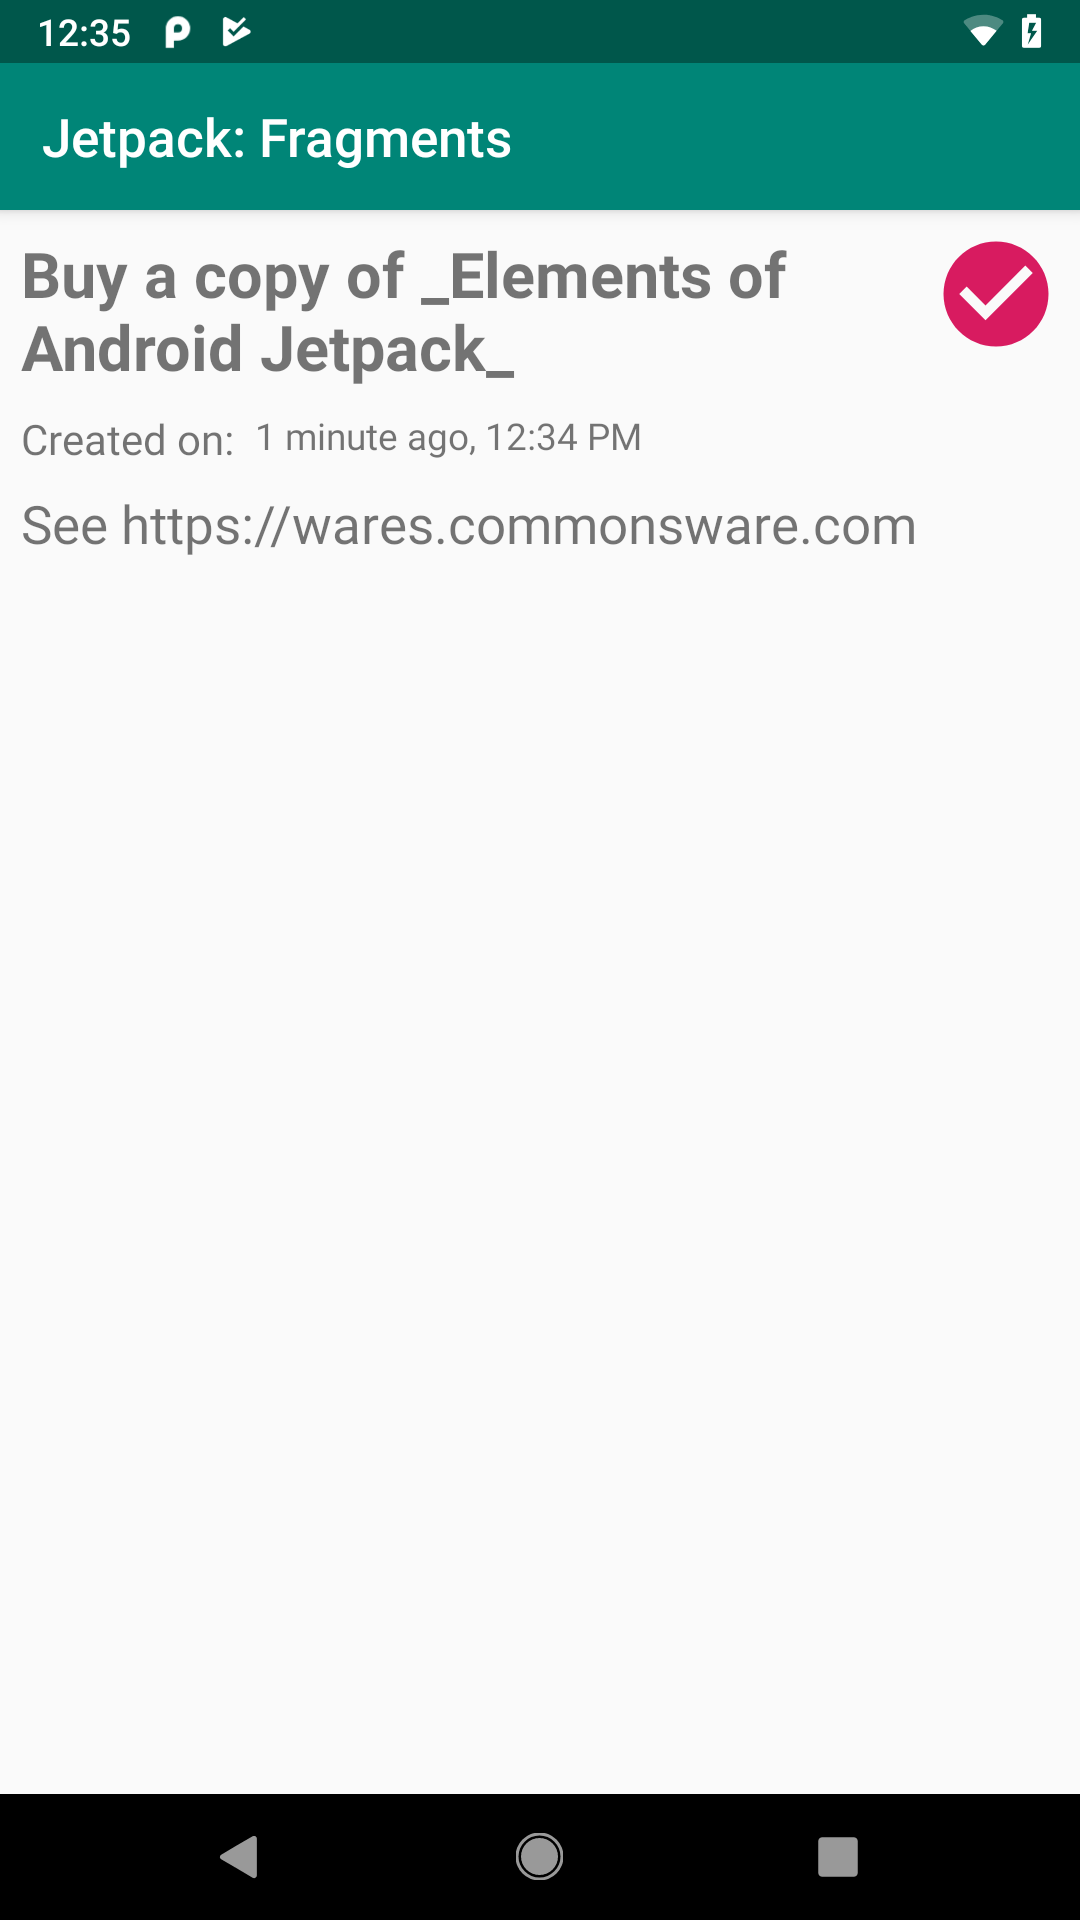
FragmentManual Sample App, Showing To-Do Item Details
This version of the app is read-only, though readers of Exploring Android will create a version of this app that allows users to add, edit, and remove to-do items.
The Model
Objects that represent our “business data” are usually called “model objects”. In a to-do list app, we need objects that represent to-do items, and those would be considered model objects.
So the sample app has a ToDoModel class that holds onto things like the description (e.g., "Write an app for somebody in my community"), the creation time, and so forth.
There are five pieces of data that we want to track:
- The description, as mentioned above
- Whether or not the item is completed, which will control things like whether the
CheckBoxis checked in the list and whether the checkmark icon shows up in the detail screen - Some optional additional notes about the item (e.g.,
"Talk to some people at non-profit organizations to see what they need!") - The time this item was created
- Some sort of unique identifier — while this is not important now, it will be later when we start persisting this data in a database
Functionally, the Java and Kotlin editions of this class are identical. The code, though, winds up being a fair bit different.
Kotlin
In Kotlin. we can use a simple data class, with individual val properties for the five pieces of data mentioned above:
data class ToDoModel(
  val id: String,
  val description: String,
  val isCompleted: Boolean = false,
  val notes: String? = null,
  val createdOn: Instant = Instant.now()
)
Of particular interest:
-
isCompletedis defaulted tofalse -
notescan benulland is defaulted tonull -
createdOnis defaulted to the current date and time
Because this is a data class, we get things like a copy() function, toString(), equals(), and so forth “for free”, courtesy of the Kotlin compiler.
 You can learn more about
 data classes in the "Data Class" chapter of Elements of Kotlin!
Java
We want the same basic characteristics in Java. It requires a bit more code:
public class ToDoModel {
  @NonNull
  public final String id;
  @NonNull
  public final String description;
  public final boolean isCompleted;
  @Nullable
  public final String notes;
  @NonNull
  public final Instant createdOn;

  ToDoModel(@NonNull String id, @NonNull String description,
            boolean isCompleted, @Nullable String notes,
            @NonNull Instant createdOn) {
    this.id = id;
    this.description = description;
    this.isCompleted = isCompleted;
    this.notes = notes;
    this.createdOn = createdOn;
  }
We have fields for each of the five pieces of data. Those that are objects are marked with @Nullable and @NotNull annotations, so that Android Studio can help ensure that we use them properly with respect to null values. The fields are marked as final, which is as close as Java comes to the immutability that you get with val properties in a Kotlin data class.
We also have a constructor to fill in those fields. However, we do not have default parameter values, so the caller will need to supply all five pieces of data whenever it creates an instance of ToDoModel.
A Sidebar About Instant
ToDoModel uses Instant. Instant was added to Java in Java 8, but it did not show up in the Android SDK until API Level 26. On the surface, this would suggest that we should not be using Instant, as the minSdkVersion of the Java and Kotlin projects is 21. Using newer classes on older devices usually results in a crash, such as a ClassNotFoundException.
In this case, though, it works.
The reason is that Google is taking some steps to allow some Java 8 features to be used on older devices. Support for things like Java 8 lambda expressions have been around for a few years. In 2020, they added support for some Java 8-specific types, Instant being one of them.
To be able to support Instant on older devices, you need two items in your module’s build.gradle file. The first is a coreLibraryDesugaringEnabled true directive in the compileOptions closure in the android closure:
  compileOptions {
    coreLibraryDesugaringEnabled true
    sourceCompatibility JavaVersion.VERSION_1_8
    targetCompatibility JavaVersion.VERSION_1_8
  }
The other is a coreLibraryDesugaring dependency directive to pull in some version of com.android.tools:desugar_jdk_libs, as part of your dependencies:
dependencies {
  implementation "org.jetbrains.kotlin:kotlin-stdlib-jdk7:$kotlin_version"
  implementation 'androidx.appcompat:appcompat:1.3.1'
  implementation 'androidx.recyclerview:recyclerview:1.2.1'
  implementation 'androidx.lifecycle:lifecycle-viewmodel-ktx:2.3.1'
  implementation 'androidx.constraintlayout:constraintlayout:2.1.1'
  implementation project(":Utilities")
  coreLibraryDesugaring 'com.android.tools:desugar_jdk_libs:1.1.5'
}
The Repository
Repositories are a common pattern in modern Android app development.
The idea of a repository is to isolate details of how data is stored from the UI that is using that data. The UI should neither know nor care whether the data is stored in a database, in some other type of file, or on a Web service. Similarly, the code that handles the data storage should not care whether the data is represented visually in fields, checkboxes, or other sorts of widgets. Having a clean boundary between “the stuff that stores data” and “the stuff that uses data” can also help with testing. We will explore the repository pattern in greater detail later in the book.
For now, though, we need something that can hold a few fake ToDoModel instances, so we may as well set up a ToDoRepository for that.
A real repository can be very complicated. This sample app has no actual data storage, so our ToDoRepository is fairly trivial:
package com.commonsware.jetpack.samplerj.fragments;

import java.time.Instant;
import java.util.ArrayList;
import java.util.HashMap;
import java.util.List;
import java.util.Map;
import java.util.UUID;
import androidx.annotation.NonNull;
import androidx.annotation.Nullable;

class ToDoRepository {
  static final ToDoRepository INSTANCE = new ToDoRepository();
  private final Map<String, ToDoModel> items = new HashMap<>();

  private ToDoRepository() {
    add(new ToDoModel(UUID.randomUUID().toString(),
      "Buy a copy of _Elements of Android Jetpack_", true,
      "See https://wares.commonsware.com",
      Instant.now()));
    add(
      new ToDoModel(UUID.randomUUID().toString(), "Read the entire book",
        false, null,
        Instant.now()));
    add(new ToDoModel(UUID.randomUUID().toString(),
      "Write an app for somebody in my community", false,
      "Talk to some people at non-profit organizations to see what they need!",
      Instant.now()));
  }

  @NonNull
  List<ToDoModel> getItems() {
    return new ArrayList<>(items.values());
  }

  @Nullable
  ToDoModel findItemById(String id) {
    return items.get(id);
  }

  private void add(ToDoModel model) {
    items.put(model.id, model);
  }
}
package com.commonsware.jetpack.sampler.fragments

import java.util.*

object ToDoRepository {
  private val items = listOf(
    ToDoModel(
      id = UUID.randomUUID().toString(),
      description = "Buy a copy of _Elements of Android Jetpack_",
      isCompleted = true,
      notes = "See https://wares.commonsware.com"
    ), ToDoModel(
      id = UUID.randomUUID().toString(),
      description = "Read the entire book"
    ), ToDoModel(
      id = UUID.randomUUID().toString(),
      description = "Write an app for somebody in my community",
      notes = "Talk to some people at non-profit organizations to see what they need!"
    )
  ).associateBy { it.id }

  fun getItems(): List<ToDoModel> = items.values.toList()

  fun findItemById(id: String) = items[id]
}The repository holds a Map of ToDoModel objects, keyed by their id value. It has functions to retrieve all models or a single model by ID.
The repository is set up as a singleton, either using a static field in Java or simply having the repository be an object in Kotlin. That works, but it is not very flexible. Later in the book, we will explore ways in which our app can use the repository like a singleton, yet we would have the ability to swap out implementations of the repository to use in different scenarios, through what is known as “dependency inversion”.
The DisplayFragment
We need to display a ToDoModel to the user. And, in this sample app, we want to use fragments for that. So, we have a DisplayFragment that will fill that role. That DisplayFragment has its own layout and viewmodel, just like an activity might. The Java/Kotlin code for the fragment is a bit different than what you would see in an activity, but not that different.
So, let’s look at each of the pieces individually.
The Layout
The todo_display layout resource represents the UI that we want to use to show a ToDoModel to the user:
<?xml version="1.0" encoding="utf-8"?>
<layout xmlns:android="http://schemas.android.com/apk/res/android"
  xmlns:app="http://schemas.android.com/apk/res-auto">

  <data>

    <variable
      name="model"
      type="com.commonsware.jetpack.sampler.fragments.ToDoModel" />

    <variable
      name="createdOnFormatted"
      type="java.lang.CharSequence" />

    <import type="android.view.View" />
  </data>

  <androidx.constraintlayout.widget.ConstraintLayout
    android:layout_width="match_parent"
    android:layout_height="match_parent">

    <ImageView
      android:id="@+id/completed"
      android:layout_width="@dimen/checked_icon_size"
      android:layout_height="@dimen/checked_icon_size"
      android:layout_marginEnd="8dp"
      android:layout_marginTop="8dp"
      android:contentDescription="@string/is_completed"
      android:src="@drawable/ic_check_circle_black_24dp"
      android:tint="@color/colorAccent"
      android:visibility="@{model.isCompleted ? View.VISIBLE : View.GONE}"
      app:layout_constraintEnd_toEndOf="parent"
      app:layout_constraintTop_toTopOf="parent" />

    <TextView
      android:id="@+id/desc"
      android:layout_width="0dp"
      android:layout_height="wrap_content"
      android:layout_marginEnd="8dp"
      android:layout_marginStart="8dp"
      android:layout_marginTop="8dp"
      android:text="@{model.description}"
      android:textSize="@dimen/desc_view_size"
      android:textStyle="bold"
      app:layout_constraintEnd_toStartOf="@+id/completed"
      app:layout_constraintStart_toStartOf="parent"
      app:layout_constraintTop_toTopOf="parent" />

    <TextView
      android:id="@+id/label_created"
      android:layout_width="wrap_content"
      android:layout_height="wrap_content"
      android:layout_marginStart="8dp"
      android:layout_marginTop="8dp"
      android:text="@string/created_on"
      android:textSize="@dimen/created_on_size"
      app:layout_constraintStart_toStartOf="parent"
      app:layout_constraintTop_toBottomOf="@+id/desc" />

    <TextView
      android:id="@+id/created_on"
      android:layout_width="0dp"
      android:layout_height="wrap_content"
      android:layout_marginEnd="8dp"
      android:layout_marginStart="8dp"
      android:layout_marginTop="8dp"
      android:text="@{createdOnFormatted}"
      app:layout_constraintEnd_toStartOf="@+id/completed"
      app:layout_constraintStart_toEndOf="@+id/label_created"
      app:layout_constraintTop_toBottomOf="@+id/desc" />

    <TextView
      android:id="@+id/notes"
      android:layout_width="0dp"
      android:layout_height="0dp"
      android:layout_marginBottom="8dp"
      android:layout_marginEnd="8dp"
      android:layout_marginStart="8dp"
      android:layout_marginTop="8dp"
      android:text="@{model.notes}"
      android:textSize="@dimen/notes_size"
      app:layout_constraintBottom_toBottomOf="parent"
      app:layout_constraintEnd_toEndOf="parent"
      app:layout_constraintStart_toStartOf="parent"
      app:layout_constraintTop_toBottomOf="@+id/label_created" />

  </androidx.constraintlayout.widget.ConstraintLayout>
</layout>On the whole, this is a basic ConstraintLayout-based layout resource, akin to those that we have seen previously in the book. It uses data binding to populate the core widgets.
The most interesting widget of the lot, though, is the ImageView:
    <ImageView
      android:id="@+id/completed"
      android:layout_width="@dimen/checked_icon_size"
      android:layout_height="@dimen/checked_icon_size"
      android:layout_marginEnd="8dp"
      android:layout_marginTop="8dp"
      android:contentDescription="@string/is_completed"
      android:src="@drawable/ic_check_circle_black_24dp"
      android:tint="@color/colorAccent"
      android:visibility="@{model.isCompleted ? View.VISIBLE : View.GONE}"
      app:layout_constraintEnd_toEndOf="parent"
      app:layout_constraintTop_toTopOf="parent" />
The icon that we use — ic_check_circle_black_24dp — is one imported from clip art through the Vector Asset wizard, the same way that we setup Toolbar icons in an earlier chapter. However, we want it to show up in a different color. We could hand-modify the XML of the resource. A simpler approach is used here, where we use android:tint to apply our colorAccent color to the widget. All black pixels will be replaced with pixels based on our accent color. This way, if we elect to change the accent color, changing the color resource affects this ImageView without having to modify the drawable itself.
Also, the ImageView uses a slightly complicated data binding expression:
android:visibility="@{model.isCompleted ? View.VISIBLE : View.GONE}"
We want the icon to be visible if the isCompleted property is true. The android:visibility attribute handles this, with three possible values:
visible-
invisible: the widget’s pixels are not drawn, but it still takes up space on the screen -
gone: the widget is ignored entirely
We want to toggle the visibility to be visible or gone based on whether the to-do item has been completed.
Here, we use a “ternary expression”. This mimics the ternary expressions available in Java (though not in Kotlin). A ternary expression is made up of three pieces:
- To the left of the
?is somebooleanvalue — in our case, the value of theisCompletedproperty - To the left of the
:is the value to use if thebooleanvalue istrue - To the right of the
:is the value to use if thebooleanvalue isfalse
The end result is that the user sees a tinted checkmark if the to-do item is completed.
The ViewModel
DisplayFragment has a DisplayViewModel to hold its data across configuration changes:
package com.commonsware.jetpack.samplerj.fragments;

import androidx.lifecycle.ViewModel;

public class DisplayViewModel extends ViewModel {
  private ToDoModel model;

  ToDoModel getModel(String id) {
    if (model == null) {
      model = ToDoRepository.INSTANCE.findItemById(id);
    }

    return model;
  }
}
package com.commonsware.jetpack.sampler.fragments

import androidx.lifecycle.ViewModel

class DisplayViewModel : ViewModel() {
  private var model: ToDoModel? = null

  fun getModel(id: String) =
    model ?: ToDoRepository.findItemById(id).also { model = it }
}Each instance of our DisplayFragment will display a single ToDoModel instance. The fragment starts out with just the ID of the model, though, as we will see in the next section. Our DisplayViewModel just asks our ToDoRepository for the ToDoModel associated with that ID.
The Class Declaration
As noted earlier in the chapter, we are using androidx.fragment.app.Fragment as our Fragment implementation, so DisplayFragment extends from that class.
Fragments should have a public zero-argument constructor. That is because the fragment code — such as the AndroidX fragment code — will create instances of our fragments for us after configuration changes. The only constructor that this code knows how to use is a public zero-argument constructor.
In Java, we skip any constructor and just extend from Fragment:
public class DisplayFragment extends Fragment {
We will look at the Kotlin edition of the fragment later in the chapter.
The Factory Function
Frequently, our fragments need to know what they are supposed to do. In the case of DisplayFragment, it needs to know what ToDoModel to display. Given DisplayViewModel, we can get a ToDoModel given its ID… but we still need for DisplayFragment to get that ID. Since we are using zero-argument constructors, we need another way to get that ID over to the fragment.
With manual fragments, that typically involves a factory function that can create instances of our DisplayFragment for us.
In Java, that would be a static method that returns a DisplayFragment:
  static DisplayFragment newInstance(String modelId) {
    DisplayFragment result = new DisplayFragment();
    Bundle args = new Bundle();

    args.putString(ARG_MODEL_ID, modelId);
    result.setArguments(args);

    return result;
  }
The Arguments Bundle
These functions take a modelId as input and return a DisplayFragment as output. What happens in between is that the function attaches an “arguments Bundle” to the fragment, putting that model ID String into the Bundle.
We do this to handle the case where our process is terminated while in the background, but the user returns to our activity and its fragments quickly. The arguments Bundle for the fragment forms part of the saved instance state of our activity. This way, we can hold onto the model ID and be able to show that model again… in theory.
In reality, we generate fresh model objects with fresh IDs whenever we get a fresh process, so the ID from the old process will be wrong. That is because this example is very fake and does not persist its model data in a database. We will correct that limitation in a later chapter.
We use a constant named ARG_MODEL_ID as the key to the value for the Bundle:
private static final String ARG_MODEL_ID = "modelId";
In Java, we create that Bundle like we would any other object.
So, overall, the newInstance() factory function:
- Creates an instance of
DisplayFragment - Creates a
Bundle - Puts the model ID into the
Bundleunder theARG_MODEL_IDkey - Attaches the
Bundleto the fragment viasetArguments() - Returns the
DisplayFragmentwith the attachedBundle
The onCreateView() Function
A fragment typically has an onCreateView() function, whether on its own or one that it inherits from some superclass. The job of onCreateView() is to return the View that represents the view hierarchy to be managed by this fragment. In the case of DisplayFragment, we want to use the view hierarchy defined by the todo_display layout resource.
We are using data binding in this sample, so our todo_display layout resource gives us a TodoDisplayBinding class, courtesy of the data binding code generator. So, as we did in previous data binding examples, we can use that binding class to inflate() our UI and return the getRoot() View from onCreateView():
  @Nullable
  @Override
  public View onCreateView(@NonNull LayoutInflater inflater,
                           @Nullable ViewGroup container,
                           @Nullable Bundle savedInstanceState) {
    binding = TodoDisplayBinding.inflate(inflater, container, false);

    return binding.getRoot();
  }
We are also holding onto the binding in a binding property for later use.
The onViewCreated() Function
A fragment also typically has an onViewCreated() function. This will be called after onCreateView(), and it is where you configure and populate the widgets that are part of the UI that the fragment is managing.
In our case, we are using data binding, so this is where we can bind our ToDoModel into the layout, to invoke the binding expressions and fill in the widgets.
To do that, we:
- Get our
DisplayViewModelfrom aViewModelProvidertied to our fragment - Get the model ID out of the arguments
Bundle - Pass that ID to
getModel()on theDisplayViewModelto retrieve ourToDoModel - Put that model, and a formatted edition of the
createdOnvalue, into the binding
  @Override
  public void onViewCreated(@NonNull View view,
                            @Nullable Bundle savedInstanceState) {
    super.onViewCreated(view, savedInstanceState);

    DisplayViewModel vm =
      new ViewModelProvider(this).get(DisplayViewModel.class);
    String modelId = getArguments().getString(ARG_MODEL_ID);

    if (modelId == null) {
      throw new IllegalArgumentException("no modelId provided!");
    }

    ToDoModel model = vm.getModel(modelId);

    if (model != null) {
      binding.setModel(model);
      binding.setCreatedOnFormatted(DateUtils.getRelativeDateTimeString(
        getActivity(),
        model.createdOn.toEpochMilli(), DateUtils.MINUTE_IN_MILLIS,
        DateUtils.WEEK_IN_MILLIS, 0
      ));
    }
  }
Note that we are using a DateUtils utility class supplied by Android for formatting our date and time. The big advantage of using DateUtils is that this class is aware of the user’s settings for how they prefer to see the date and time (e.g., 12- versus 24-hour mode). Specifically, we are using the getRelativeDateTimeString() method on DateUtils, which will return a value that expresses the creation time relative to now using phrases like “5 minutes ago” or “2 days ago”.
The net result is that after onViewCreated() returns, our widgets will have the desired contents.
Of course, so far, we have glossed over the issue of when and how any of this happens. We have this lovely factory function… but something needs to call it. That function creates a perfectly delightful fragment… but something needs to arrange to show it on the screen. We will explore those steps in the upcoming sections.
The ListFragment
We also have a ListFragment that is responsible for displaying the list of to-do items. When the user clicks on an item in the list, we want to then show the DisplayFragment.
There are several pieces that come together to show this list, with ListFragment acting as a central coordinator for all of them.
The Fragment Layout
As we have seen in other samples in this book, this sample app uses a RecyclerView for displaying the list of to-do items. Our todo_roster layout resource has that RecyclerView, and nothing else:
<?xml version="1.0" encoding="utf-8"?>
<androidx.recyclerview.widget.RecyclerView android:id="@+id/items"
  xmlns:android="http://schemas.android.com/apk/res/android"
  android:layout_width="match_parent"
  android:layout_height="match_parent" />
The Row Layout
We also need a layout resource for the rows to appear in the list. That layout — todo_row — is a bit more interesting:
<?xml version="1.0" encoding="utf-8"?>
<layout xmlns:android="http://schemas.android.com/apk/res/android"
  xmlns:app="http://schemas.android.com/apk/res-auto">

  <data>

    <variable
      name="model"
      type="com.commonsware.jetpack.sampler.fragments.ToDoModel" />
  </data>

  <androidx.constraintlayout.widget.ConstraintLayout
    android:layout_width="match_parent"
    android:layout_height="wrap_content"
    android:background="?android:attr/selectableItemBackground"
    android:clickable="true"
    android:focusable="true">

    <CheckBox
      android:id="@+id/checkbox"
      android:layout_width="wrap_content"
      android:layout_height="wrap_content"
      android:layout_marginBottom="8dp"
      android:layout_marginEnd="8dp"
      android:layout_marginStart="8dp"
      android:layout_marginTop="8dp"
      android:checked="@{model.isCompleted}"
      android:textSize="@dimen/desc_size"
      app:layout_constraintBottom_toBottomOf="parent"
      app:layout_constraintStart_toStartOf="parent"
      app:layout_constraintTop_toTopOf="parent" />

    <TextView
      android:id="@+id/desc"
      android:layout_width="0dp"
      android:layout_height="wrap_content"
      android:layout_marginBottom="8dp"
      android:layout_marginEnd="8dp"
      android:layout_marginStart="8dp"
      android:layout_marginTop="8dp"
      android:text="@{model.description}"
      app:layout_constraintBottom_toBottomOf="parent"
      app:layout_constraintEnd_toEndOf="parent"
      app:layout_constraintStart_toEndOf="@+id/checkbox"
      app:layout_constraintTop_toTopOf="parent" />
  </androidx.constraintlayout.widget.ConstraintLayout>
</layout>
From a user experience standpoint, we want:
- The user to be able to mark the to-do item as completed by toggling the checkbox (though, in this version of the app, we will not try to save that change)
- The user to be able to view details of the item, via
DisplayFragment, by clicking elsewhere on the row
Normally, a CheckBox is both the actual “checkbox” square plus associated text. So, visually, we could say that each row is just a CheckBox widget. But then clicks on the text will wind up toggling the CheckBox state, as CheckBox interprets all clicks on it equally. In our case, we want to distinguish between clicks on the checkbox and clicks on the rest of the row, so we cannot just use CheckBox alone.
To that end, we have both a CheckBox and a TextView in our row, wrapped in a ConstraintLayout, to mimic the presentation of a regular CheckBox but not have clicks on the text trigger CheckBox state changes.
The root ConstraintLayout has its attributes set up such that it represents something that can be clicked upon:
android:background="?android:attr/selectableItemBackground"android:clickable="true"android:focusable="true"
We are also using data binding here, to populate the CheckBox checked state and the TextView text based on the data in a particular ToDoModel.
The Viewmodel
Once again, we have a ViewModel to hold our data to be displayed. In this case, ListViewModel holds the list of items obtained from the ToDoRepository:
package com.commonsware.jetpack.samplerj.fragments;

import java.util.List;
import androidx.lifecycle.ViewModel;

public class ListViewModel extends ViewModel {
  final List<ToDoModel> items = ToDoRepository.INSTANCE.getItems();
}
package com.commonsware.jetpack.sampler.fragments

import androidx.lifecycle.ViewModel

class ListViewModel : ViewModel() {
  val items = ToDoRepository.getItems()
}The Adapter and Row Holder
Since we are using a RecyclerView, we need a RecyclerView.Adapter and a RecyclerView.ViewHolder. And we have an interesting requirement: we want our ListFragment to get control when the user clicks on those rows, so we can navigate to the DisplayFragment.
In Kotlin, we can accomplish this by having our adapter and view-holder accept a function type as a parameter, so we can call that function when the user clicks on a row.
You can learn more about Kotlin immutability, functional programming, and function types in the "Functional Programming" chapter of Elements of Kotlin!
In Java, we can create a custom listener interface and use instances of that listener in lieu of the Kotlin function type.
Our RecyclerView.ViewHolder is called ToDoListRowHolder:
package com.commonsware.jetpack.samplerj.fragments;

import com.commonsware.jetpack.samplerj.fragments.databinding.TodoRowBinding;
import androidx.recyclerview.widget.RecyclerView;

class ToDoListRowHolder extends RecyclerView.ViewHolder {
  interface OnRowClickListener {
    void onRowClick(ToDoModel model);
  }

  private final TodoRowBinding binding;

  ToDoListRowHolder(TodoRowBinding binding, OnRowClickListener listener) {
    super(binding.getRoot());

    this.binding = binding;

    binding.getRoot().setOnClickListener(v -> {
      if (binding.getModel()!=null) {
        listener.onRowClick(binding.getModel());
      }
    });
  }

  void bind(ToDoModel model) {
    binding.setModel(model);
    binding.executePendingBindings();
  }
}
package com.commonsware.jetpack.sampler.fragments

import androidx.recyclerview.widget.RecyclerView
import com.commonsware.jetpack.sampler.fragments.databinding.TodoRowBinding

class ToDoListRowHolder(
  private val binding: TodoRowBinding,
  onRowClick: (ToDoModel) -> Unit
) :
  RecyclerView.ViewHolder(binding.root) {
  init {
    binding.root.setOnClickListener { binding.model?.let { onRowClick(it) } }
  }

  fun bind(model: ToDoModel) {
    binding.model = model
    binding.executePendingBindings()
  }
}We receive a TodoRowBinding object in our constructor — that is the data binding generated binding class for our todo_row layout resource. We also receive the Kotlin function type or the Java OnRowClickListener to use to report when the user clicks on rows.
Then, we:
- Hold onto the
bindingin a property - Set up a click listener on the
ConstraintLayout(the root of our binding) and invoke the Kotlin function type or call the Java listener when the user clicks on a row - Bind a model to the binding in
bind()as requested
We can supply the ToDoModel to the function type or listener by asking our binding for its model via getModel(). This way, we can pass the ToDoModel upstream when the user clicks on its row.
Our RecyclerView.Adapter is called ToDoListAdapter:
package com.commonsware.jetpack.samplerj.fragments;

import android.view.LayoutInflater;
import android.view.ViewGroup;
import com.commonsware.jetpack.samplerj.fragments.databinding.TodoRowBinding;
import androidx.annotation.NonNull;
import androidx.recyclerview.widget.ListAdapter;

class ToDoListAdapter extends ListAdapter<ToDoModel, ToDoListRowHolder> {
  private final LayoutInflater inflater;
  private final ToDoListRowHolder.OnRowClickListener listener;

  protected ToDoListAdapter(LayoutInflater inflater,
                            ToDoListRowHolder.OnRowClickListener listener) {
    super(ToDoModel.DIFF_CALLBACK);
    this.inflater = inflater;
    this.listener = listener;
  }

  @NonNull
  @Override
  public ToDoListRowHolder onCreateViewHolder(@NonNull ViewGroup parent,
                                              int viewType) {
    return new ToDoListRowHolder(
      TodoRowBinding.inflate(inflater, parent, false), listener);
  }

  @Override
  public void onBindViewHolder(@NonNull ToDoListRowHolder holder,
                               int position) {
    holder.bind(getItem(position));
  }
}
package com.commonsware.jetpack.sampler.fragments

import android.view.LayoutInflater
import android.view.ViewGroup
import androidx.recyclerview.widget.ListAdapter
import com.commonsware.jetpack.sampler.fragments.databinding.TodoRowBinding

class ToDoListAdapter(private val inflater: LayoutInflater,
                      private val onRowClick: (ToDoModel) -> Unit) :
  ListAdapter<ToDoModel, ToDoListRowHolder>(ToDoModelDiffCallback) {
  override fun onCreateViewHolder(parent: ViewGroup, viewType: Int) =
    ToDoListRowHolder(TodoRowBinding.inflate(inflater, parent, false), onRowClick)

  override fun onBindViewHolder(holder: ToDoListRowHolder, position: Int) {
    holder.bind(getItem(position))
  }
}ToDoListAdapter is a ListAdapter, and so we need our DiffUtil.ItemCallback to help identify changes in our data model. That is implemented on ToDoModel, as our model class should know how to compare instances of itself:
  static final DiffUtil.ItemCallback<ToDoModel> DIFF_CALLBACK =
    new DiffUtil.ItemCallback<ToDoModel>() {
      @Override
      public boolean areItemsTheSame(@NonNull ToDoModel oldItem,
                                     @NonNull ToDoModel newItem) {
        return oldItem == newItem;
      }

      @Override
      public boolean areContentsTheSame(@NonNull ToDoModel oldItem,
                                        @NonNull ToDoModel newItem) {
        return oldItem.isCompleted == newItem.isCompleted &&
          oldItem.description.equals(newItem.description);
      }
    };
object ToDoModelDiffCallback : DiffUtil.ItemCallback<ToDoModel>() {
  override fun areItemsTheSame(oldItem: ToDoModel, newItem: ToDoModel) =
    oldItem === newItem

  override fun areContentsTheSame(oldItem: ToDoModel, newItem: ToDoModel) =
    oldItem.isCompleted == newItem.isCompleted &&
        oldItem.description == newItem.description
}ToDoListAdapter also accepts our function type or listener in its constructor, to pass to the constructors of each of the ToDoListRowHolder instances.
Beyond that, ToDoListAdapter is a fairly simple ListAdapter implementation, creating instances of ToDoListRowHolder in onCreateViewHolder() and binding ToDoModel instances in onBindViewHolder().
The Fragment
With all that done, our ListFragment has little to do, other than connect the remaining pieces:
package com.commonsware.jetpack.samplerj.fragments;

import android.os.Bundle;
import android.view.LayoutInflater;
import android.view.View;
import android.view.ViewGroup;
import com.commonsware.jetpack.samplerj.fragments.databinding.TodoRosterBinding;
import androidx.annotation.NonNull;
import androidx.annotation.Nullable;
import androidx.fragment.app.Fragment;
import androidx.lifecycle.ViewModelProvider;
import androidx.recyclerview.widget.LinearLayoutManager;

public class ListFragment extends Fragment {
  private TodoRosterBinding binding;

  @Nullable
  @Override
  public View onCreateView(@NonNull LayoutInflater inflater,
                           @Nullable ViewGroup container,
                           @Nullable Bundle savedInstanceState) {
    binding = TodoRosterBinding.inflate(inflater, container, false);

    return binding.getRoot();
  }

  @Override
  public void onViewCreated(@NonNull View view,
                            @Nullable Bundle savedInstanceState) {
    super.onViewCreated(view, savedInstanceState);

    ListViewModel vm = new ViewModelProvider(this).get(ListViewModel.class);

    binding.items.setLayoutManager(new LinearLayoutManager(getContext()));

    ToDoListAdapter adapter = new ToDoListAdapter(getLayoutInflater(),
      this::navTo);

    adapter.submitList(vm.items);
    binding.items.setAdapter(adapter);
  }

  @Override
  public void onDestroyView() {
    super.onDestroyView();

    binding = null;
  }

  private void navTo(ToDoModel model) {
    getParentFragmentManager().beginTransaction()
      .replace(android.R.id.content, DisplayFragment.newInstance(model.id))
      .addToBackStack(null)
      .commit();
  }
}
As with DisplayFragment, we will focus on the Java edition of the fragment now and will examine the Kotlin edition later in the chapter.
Our onCreateView() function sets up the UI to be managed by this fragment. That is the RecyclerView defined in the todo_roster layout resource. That layout resource does not use data binding, so we can use inflate() on LayoutInflater directly to load that layout resource and create the RecyclerView.
As with DisplayFragment, our onViewCreated() function configures the UI that we inflated in onCreateView(). Here we:
- Get our
ListViewModelfrom aViewModelProvider - Create a
LinearLayoutManagerand attach it to theRecyclerView - Create a
ToDoListAdapterand attach it to theRecyclerView - Get our list of
ToDoModelobjects from theListViewModeland supply those to theToDoListAdapterviasubmitList()
When we create the ToDoListAdapter, we need to supply our onItemClick function type or listener implementation. In Java, we use a Java 8 method reference to have a generated listener call our navTo() method.
So, when the user clicks a row, whether we are in Java or Kotlin, navTo() is called. There, we need to arrange to show the DisplayFragment.
The FragmentTransaction
navTo() uses a FragmentTransaction to display the DisplayFragment.
The Java edition of navTo() has a fairly classic recipe for performing a FragmentTransaction:
  private void navTo(ToDoModel model) {
    getParentFragmentManager().beginTransaction()
      .replace(android.R.id.content, DisplayFragment.newInstance(model.id))
      .addToBackStack(null)
      .commit();
  }
First, to get a FragmentTransaction, we need a FragmentManager. A fragment can get a FragmentManager by calling getParentFragmentManager(). This returns the FragmentManager that manages calling Fragment and any of its peer fragments.
Next, to get a FragmentTransaction for use, we can call beginTransaction() on the FragmentManager. This returns a FragmentTransaction ready for us to configure and commit.
In our case, we do two things to configure the FragmentTransaction:
- We call
replace()to say “please replace any fragment in theandroid.R.id.contentcontainer with this new fragment”. The new fragment is ourDisplayFragment, created using the factory method. The container isandroid.R.id.content, which is the framework’s ID for the container for an activity’s UI. When we callsetContentView()on an activity, the “content view” winds up as a child of theandroid.R.id.contentcontainer. - We call
addToBackStack(null), indicating that when the user clicks the BACK button, we want theFragmentTransactionto be rolled back. In our case, that would revert thereplace()call, which would causeandroid.R.id.contentto hold whatever fragment preceded theDisplayFragment. As we will see shortly, theListFragmentitself is going in that container, so reverting that transaction will cause theListFragmentto be displayed again.
Finally, once our FragmentTransaction is configured, we call commit() to say “make it so”. Shortly, the DisplayFragment will be shown on the screen, replacing the ListFragment.
The Activity
All that remains is for our activity to set up the ListFragment to be shown. That too is handled via a FragmentTransaction, much like how we navigated from ListFragment to DetailFragment. However, there is one wrinkle: we only execute the FragmentTransaction if our savedInstanceState is null:
package com.commonsware.jetpack.samplerj.fragments;

import android.os.Bundle;
import androidx.annotation.Nullable;
import androidx.appcompat.app.AppCompatActivity;

public class MainActivity extends AppCompatActivity {
  @Override
  protected void onCreate(@Nullable Bundle savedInstanceState) {
    super.onCreate(savedInstanceState);

    if (savedInstanceState == null) {
      getSupportFragmentManager().beginTransaction()
        .add(android.R.id.content, new ListFragment())
        .commit();
    }
  }
}
package com.commonsware.jetpack.sampler.fragments

import android.os.Bundle
import androidx.appcompat.app.AppCompatActivity
import androidx.fragment.app.commit

class MainActivity : AppCompatActivity() {

  override fun onCreate(savedInstanceState: Bundle?) {
    super.onCreate(savedInstanceState)

    if (savedInstanceState == null) {
      supportFragmentManager.commit {
        add(android.R.id.content, ListFragment())
      }
    }
  }
}
When the device undergoes a configuration change, Android will automatically destroy and recreate the activity and its fragments. As a result, in the re-created activity, by the time onCreate() is called, any displayed fragments will already exist. In that case, we do not need to create them ourselves. So, to distinguish between the first time the activity is created and when the activity is re-created after a configuration change, we see if the passed-in state Bundle is null. If it is, then our fragment should not yet exist, so we create one and add() it to the container via a FragmentTransaction. If the Bundle is not null, though, then the fragment should already exist, so we can skip the step for creating and adding it.
Another approach that we could use is to see if the container already has a fragment in it, using code like:
  override fun onCreate(savedInstanceState: Bundle?) {
    super.onCreate(savedInstanceState)

    if (supportFragmentManager.findFragmentById(android.R.id.content) == null) {
      supportFragmentManager.transaction {
        add(android.R.id.content, ListFragment())
      }
    }
  }
Those approaches are subtly different. The original asks “did the activity get re-created?”. The revision asks “do we have a fragment in the container already?”. In the context of this app, those will be equivalent, so either approach can work. In more elaborate apps, where fragments might be coming and going with greater frequency and complexity, those approaches may yield different results, and you will want to choose the one that better matches the actual need of your code and situation.
On an activity, we use getSupportFragmentManager() to get the FragmentManager to use. There is also a getFragmentManager() method, but it refers to the deprecated framework edition of fragments, which is not what we want. getFragmentManager() itself is deprecated, to help further warn us that this is not the method that we are looking for.
The Kotlin code is a bit different, because the Kotlin edition of the project has added androidx.fragment:fragment-ktx as a dependency. This Android KTX library offers some simpler syntax for Kotlin’s use of FragmentTransaction.
Part of that syntax change is just ordinary Kotlin, where getSupportFragmentManager() can be replaced by reading the supportFragmentManager pseudo-property.
Part of that syntax change comes from Android KTX, in the form of that androidx.fragment:fragment-ktx library. It adds an extension function to FragmentManager, named commit(). The commit() function:
- Accepts a function type as a parameter, typically in the form of a lambda expression as shown here
- Begins a
FragmentTransaction - Invokes that function type, setting the
FragmentTransactionto be the current object (i.e.,this), so calls likereplace()andaddToBackStack()can be called directly - Commits that
FragmentTransactiononce the function type returns
The Recap
So, we have two fragments, each with their own viewmodel. The MainActivity sets up the first fragment (ListFragment). That fragment renders its own UI and switches to a different fragment (DisplayFragment) based on user input. The second fragment handles its own UI, independently from the first fragment, other than for data explicitly passed between them (the to-do item’s ID).
We could have implemented the same thing using two activities, instead of a single activity and two fragments. A lot of classic Android app development would have taken that approach. The Jetpack recommendations are to use fragments where possible and minimize your number of activities, for greater flexibility in implementing your UI.
Prev Table of Contents Next
This book is licensed under the Creative Commons Attribution-ShareAlike 4.0 International license.