Colors in an App Widget
The ColorWidget sample module in the Sampler and SamplerJ projects mostly is a variant on the “show a list of colors” samples that we have seen already. This one, though, also has an app widget, to show a random color to the user. It also:
- Offers a refresh button, in case you do not like that color
- Shows the
BigSwatchFragmentfor the random color if the user taps on the app widget (other than on the refresh button)
The Layout
The layout resource describing the UI of the app widget (res/layout/widget.xml) is fairly conventional… except for the choice of container:
<?xml version="1.0" encoding="utf-8"?>
<LinearLayout
  xmlns:android="http://schemas.android.com/apk/res/android"
  xmlns:tools="http://schemas.android.com/tools"
  android:id="@+id/root"
  android:layout_width="match_parent"
  android:layout_height="match_parent"
  android:orientation="horizontal"
  android:padding="8dp"
  tools:background="#FFFF0000">

  <TextView
    android:id="@+id/label"
    style="?android:attr/textAppearanceLarge"
    android:layout_width="0dp"
    android:layout_height="wrap_content"
    android:layout_gravity="center_vertical"
    android:layout_weight="1"
    android:typeface="monospace"
    tools:text="#abcdef" />

  <ImageButton
    android:id="@+id/refresh"
    android:layout_width="wrap_content"
    android:layout_height="wrap_content"
    android:layout_gravity="center_vertical"
    android:contentDescription="@string/menu_refresh"
    android:src="@drawable/ic_refresh_black_24dp" />

</LinearLayout>Here, we wrap a TextView and an ImageButton in a LinearLayout. LinearLayout was mentioned briefly back in the chapter on ConstraintLayout, where LinearLayout was mentioned as a “legacy” option. If we were creating an activity, fragment, or RecyclerView row here, we could have used ConstraintLayout for the container. That is not an option with an app widget, as ConstraintLayout is not on the list of eligible widgets and containers.
LinearLayout positions its children one after the next in a row or column. The android:orientation attribute will be horizontal for a row and vertical for a column. Here we have it set to be horizontal.
The TextView will appear first in the row, followed by the ImageButton. The ImageButton has its natural width (wrap_content). The TextView has a width of 0dp and a layout_weight of 1. The net effect is that the ImageButton will get its space in the LinearLayout, and the TextView will take over all the rest of the space. This shoves the ImageView to the far end side of the row.
Both the TextView and the ImageButton have android:layout_gravity set to center_vertical. android:layout_gravity is a hint to the LinearLayout as to where these widgets would like to be positioned, particularly in the opposite axis of the flow of the LinearLayout. center_vertical means “for this row, position these widgets centered vertically within the available space”.
The Core AppWidgetProvider
The “brains” of an app widget comes in the form of your AppWidgetProvider subclass. In the sample project, that is named ColorWidget. Much of it is unlike anything else that you have done in Android app development… which is one of the reasons why many app developers do not fuss with creating app widgets.
Our primary entry point in an AppWidgetProvider is an onUpdate() function. This is a bit like onCreate() of an activity, in that it is where we set up our UI. It is called when we first need to set up that UI.
Creating the RemoteViews
As mentioned earlier, our app’s process does not render that UI. Instead, we need to define what the UI will contain, then arrange to get that UI over to the OS. The OS, in turn, will pass that UI definition to the launcher app, which can then render that UI.
As such, while we can work with layout resources, we do not use LayoutInflater or view binding or things like that to set up our UI definition. Instead, we use a RemoteViews object. As the name suggests, RemoteViews represents a UI definition designed to be passed to another “remote” app for rendering.
To create a RemoteViews, just create an instance, supplying our application ID and the resource ID of a layout resource to use:
    RemoteViews remoteViews =
      new RemoteViews(context.getPackageName(), R.layout.widget);
val remoteViews = RemoteViews(context.packageName, R.layout.widget)
Here, we reference R.layout.widget, pointing to the widget layout we examined earlier.
Setting the Color
Usually, our app widget has a dynamic UI, just as our activities and fragments do. While the overall structure is constant, elements of data change. In this case, we want our app widget to display the hex value of a random color, plus render the background of the widget itself in that color.
With activities and fragments, we would call functions on the widgets and containers to make these sorts of changes. In this case, we do not have those widgets — all we have is the RemoteViews. So, we call functions on the RemoteViews to affect these changes, with parameters identifying which widget or container is the one that we want to modify:
    int color = random.nextInt();

    remoteViews.setTextViewText(
      R.id.label,
      context.getString(R.string.label_template, color)
    );
    remoteViews.setInt(R.id.root, "setBackgroundColor", color);
    val color = random.nextInt()

    remoteViews.setTextViewText(
      R.id.label,
      context.getString(R.string.label_template, color)
    )
    remoteViews.setInt(R.id.root, "setBackgroundColor", color)
Here, we generate a random color (color), then make two calls to functions on RemoteViews. The first one is easy: setTextViewText() is the RemoteViews equivalent of calling setText() on a TextView. We provide the ID of the TextView widget in our layout along with the text that we want to fill in.
However, very few functions exist on RemoteViews for manipulating the contents of the layout. For example, there is no setBackgroundColor() function to set the background color of some widget or container.
There is a family of functions that allow us to invoke arbitrary View functions. One is setInt(). We provide the ID of the widget to manipulate, the actual function that we want to have invoked, and an Int value. This information is tucked into the RemoteViews, and the launcher app will arrange to call this function for us.
Unfortunately, there are two problems with this approach:
- Not every
Viewfunction can be called this way - Which ones can and cannot be called this way is undocumented.
The only way to know is to look at the source code to View and see if the function has the RemotableViewMethod annotation on it. setBackgroundColor() does:
    /**
     * Sets the background color for this view.
     * @param color the color of the background
     */
    @RemotableViewMethod
    public void setBackgroundColor(@ColorInt int color) {
        if (mBackground instanceof ColorDrawable) {
            ((ColorDrawable) mBackground.mutate()).setColor(color);
            computeOpaqueFlags();
            mBackgroundResource = 0;
        } else {
            setBackground(new ColorDrawable(color));
        }
    }
There are other things that we are configuring on the RemoteViews, but we will explore them later in the chapter.
Updating the App Widget
While onUpdate() is our entry point, that is not where the code shown above appears. That code is in a private updateWidget() function that we call from onUpdate():
  @Override
  public void onUpdate(Context context, AppWidgetManager appWidgetManager,
                       int[] appWidgetIds) {
    for (int appWidgetId : appWidgetIds) {
      updateWidget(context, appWidgetManager, appWidgetId);
    }
  }
  override fun onUpdate(
    context: Context,
    appWidgetManager: AppWidgetManager,
    appWidgetIds: IntArray
  ) {
    appWidgetIds.forEach { updateWidget(context, appWidgetManager, it) }
  }
The user can not only add your app widget to their home screen, but they can do so multiple times. Each app widget is identified by an integer ID value. onUpdate() is passed an array of IDs, indicating all of the app widgets that need to be updated. Our onUpdate() functions iterate over the array and call updateWidget() for each, supplying that app widget ID to updateWidget(), along with a Context and an AppWidgetManager.
In updateWidget(), towards the bottom, we use AppWidgetManager to tell Android about our new RemoteViews for this app widget:
appWidgetManager.updateAppWidget(appWidgetId, remoteViews);
appWidgetManager.updateAppWidget(appWidgetId, remoteViews)
updateAppWidget() on AppWidgetManager takes the app widget ID and the RemoteViews and arranges to pass those to the launcher, so it can update the associated UI on the home screen.
For many app widgets, you will have data in files, databases, Web services, etc. that are tied to the app widget. You can use the app widget ID to help distinguish one app widget from another, if they each need to have separate data.
The Metadata
We also have the metadata XML resource, in res/xml/widget_metadata.xml:
<?xml version="1.0" encoding="utf-8"?>
<appwidget-provider xmlns:android="http://schemas.android.com/apk/res/android"
  android:minWidth="250dp"
  android:minHeight="40dp"
android:previewImage="@drawable/widget_preview" />The root — and only — element is <appwidget-provider>. Its attributes describe the nature of the app widget, in particular to help the home screen understand how to use it.
Specifically, here we use:
-
android:minWidthandandroid:minHeightto suggest a starting size for the app widget -
android:previewImageto supply a sample of what the app widget will look like, for use in the app widget selector UI
This is pretty much the bare minimum of what realistically you can provide for an app widget’s metadata. There are many other options, such as describing how the app widget can be resized, whether its contents should be updated automatically, etc.
The Manifest Entry
Our ColorWidget also needs to be registered in the manifest as a <receiver>:
<?xml version="1.0" encoding="utf-8"?>
<manifest package="com.commonsware.jetpack.sampler.widget"
  xmlns:android="http://schemas.android.com/apk/res/android">

  <application
    android:allowBackup="false"
    android:icon="@mipmap/ic_launcher"
    android:label="@string/app_name"
    android:roundIcon="@mipmap/ic_launcher_round"
    android:supportsRtl="true"
    android:theme="@style/AppTheme">
    <activity android:name=".MainActivity">
      <intent-filter>
        <action android:name="android.intent.action.MAIN" />

        <category android:name="android.intent.category.LAUNCHER" />
      </intent-filter>
    </activity>
    <receiver android:name=".ColorWidget">
      <intent-filter>
        <action android:name="android.appwidget.action.APPWIDGET_UPDATE" />
      </intent-filter>

      <meta-data
        android:name="android.appwidget.provider"
        android:resource="@xml/widget_metadata" />
    </receiver>
  </application>

</manifest>The android:name attribute works like its equivalent on <actiivty>, identifying the class that implements the receiver. In this case, .ColorWidget says to use the ColorWidget class inside of our package (com.commonsware.jetpack.sampler.widget).
Just as having a MAIN/LAUNCHER <intent-filter> is a requirement of activities that should appear in the launcher, an APPWIDGET_UPDATE <intent-filter> is a requirement of app widgets. The OS will send a message to our ColorWidget, using that action, when it is time for us to either set up the app widget UI or refresh it. That, in turn, is what triggers a call to onUpdate() in our ColorWidget.
Finally, the <meta-data> element is a way that you can add configuration details to the manifest for arbitrary stuff that the build tools really know about. In this case, the OS is expecting us to point to that XML metadata resource that we created. The android:name="android.appwidget.provider" attribute says “this is what metadata we are providing” and android:resource="@xml/widget_metadata" attribute says “and here is where you can find the actual metadata”.
The Basic Results
If you run the app, then add the app widget to your home screen, you will see a color represented in the rectangular app widget background, plus the hex value of the color in text:
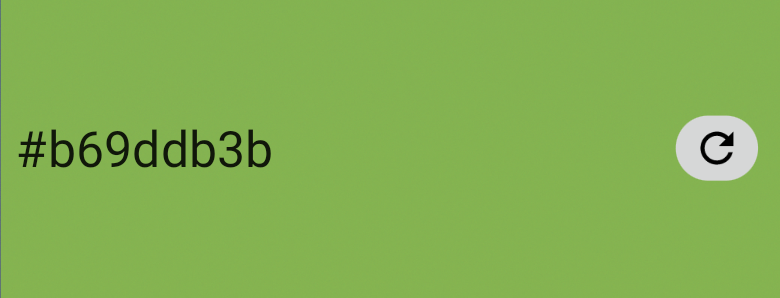
ColorWidget App Widget, Showing a Nice Shade of Green
Prev Table of Contents Next
This book is licensed under the Creative Commons Attribution-ShareAlike 4.0 International license.