Constructing a Layout
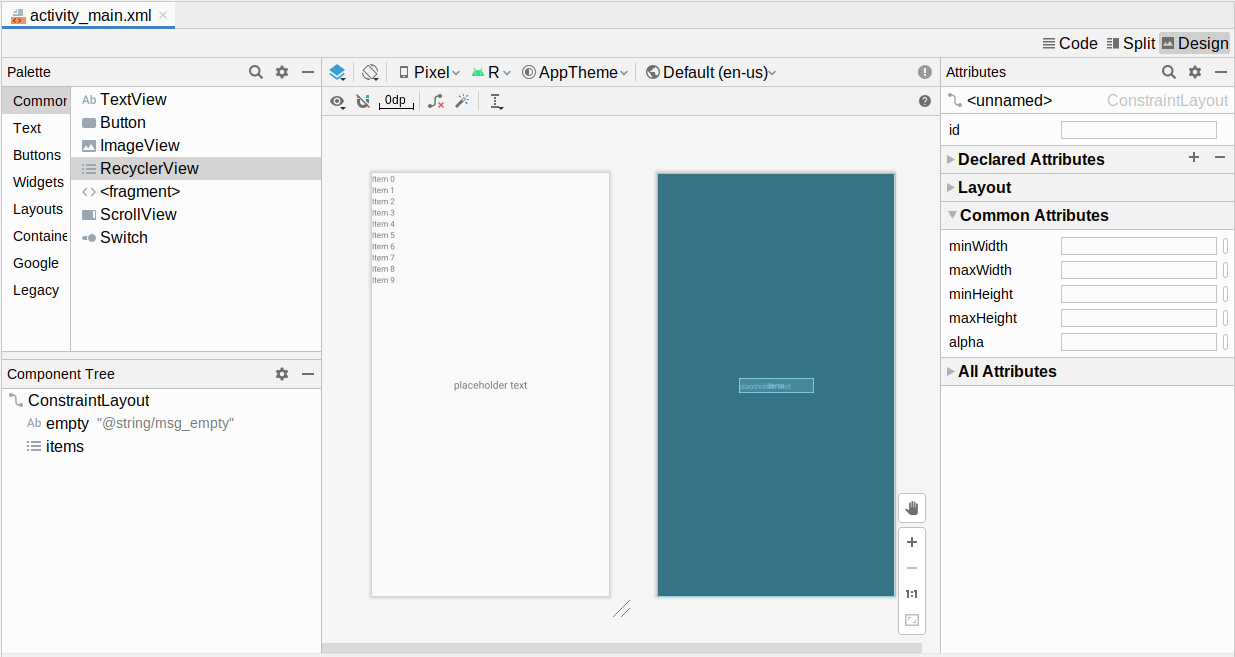
Our starter project has a layout resource: res/layout/activity_main.xml already. However, it is just a bit different from what we need. So, in this tutorial, we will modify that layout, using the Android Studio drag-and-drop GUI builder.
This is a continuation of the work we did in the previous tutorial. The book’s GitLab repository contains the results of the previous tutorial as well as the results of completing the work in this tutorial.
 You can learn more about
 ConstraintLayout in the "Introducing ConstraintLayout" chapter of Elements of Android Jetpack!
Step #1: Examining What We Have And What We Want
The starter project has a single layout resource, in res/layout/activity_main.xml. Open that in the IDE.
If it does not open up showing you XML, look towards the upper-right corner of the editor for a small toolstrip of icons:

Click the “Code” button to switch to viewing the XML of the layout.
That XML should look like:
<?xml version="1.0" encoding="utf-8"?>
<androidx.constraintlayout.widget.ConstraintLayout
  xmlns:android="http://schemas.android.com/apk/res/android"
  xmlns:app="http://schemas.android.com/apk/res-auto"
  xmlns:tools="http://schemas.android.com/tools"
  android:layout_width="match_parent"
  android:layout_height="match_parent"
  tools:context=".MainActivity">

  <TextView
    android:layout_width="wrap_content"
    android:layout_height="wrap_content"
    android:text="Hello World!"
    app:layout_constraintBottom_toBottomOf="parent"
    app:layout_constraintLeft_toLeftOf="parent"
    app:layout_constraintRight_toRightOf="parent"
    app:layout_constraintTop_toTopOf="parent" />

</androidx.constraintlayout.widget.ConstraintLayout>We have a ConstraintLayout as our root container. ConstraintLayout comes from that androidx.constraintlayout:constraintlayout artifact that we saw in our dependencies list in the preceding tutorial. ConstraintLayout is Google’s recommended base container for most layout resources, as it is the most flexible option.
Inside, we have a TextView, with a simple “Hello World!” message.
As it turns out, we can use both the ConstraintLayout and the TextView in the UI that we are going to construct:

We want:
- a
RecyclerView, to use for our list of to-do items - a
TextView, to show when theRecyclerViewis empty
The RecyclerView and the TextView will go in the same space. In code, we will toggle the visibility of the TextView, so that it is visible when we have no to-do items to show in the RecyclerView and hidden when we have one or more to-do items to show.
Prev Table of Contents Next
This book is licensed under the Creative Commons Attribution-ShareAlike 4.0 International license.