Step #5: Adding a Checkable Submenu
We have added quite a few app bar items in these tutorials. This time, we need to add one to allow the user to filter the list of items. To do that, we will use an app bar item that has a submenu of radio buttons, so the user can toggle between the different filter modes.
But, first, we need another icon.
Right-click over res/drawable/ in the project tree and choose “New” > “Vector Asset” from the context menu. This brings up the Vector Asset Wizard. There, click the “Icon” button and search for filter:
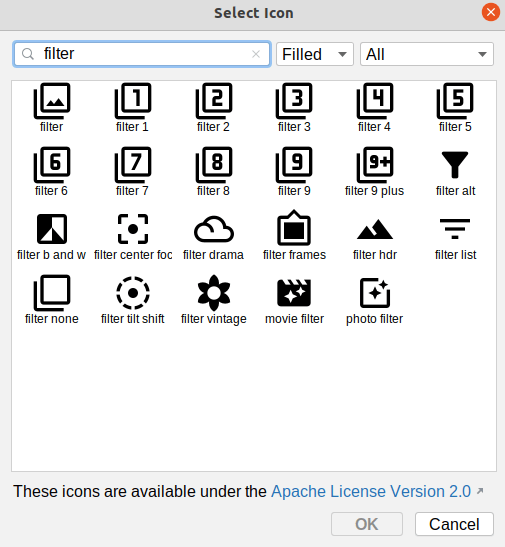
Choose the “filter list” icon and click “OK” to close up the icon selector. Change the icon’s name to ic_filter. Then, click “Next” and “Finish” to close up the wizard and set up our icon.
If the icon selector did not open, that may be due to this Arctic Fox bug. Instead, just close up the Vector Asset wizard, and download this file into res/drawable instead. That is the desired icon, already set up for you.
Next, open up the res/menu/actions_roster.xml resource file, and switch to the graphical designer. Drag a “Menu Item” from the “Palette” view into the Component Tree, slotting it before the existing “add” item:

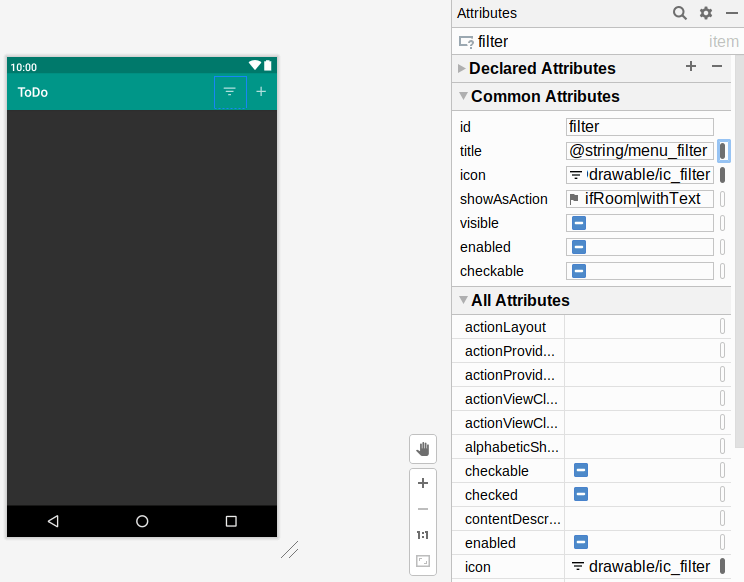
In the Attributes view for this new item, assign it an ID of filter. Then, choose both “ifRoom” and “withText” for the “showAsAction” option. Next, click on the “O” button next to the “icon” field. This will bring up an drawable resource selector. Click on ic_filter in the list of drawables, then click OK to accept that choice of icon.
Then, click the “O” button next to the “title” field. As before, this brings up a string resource selector. Click on “Add new resource” > “New string Value” in the drop-down towards the top. In the dialog, fill in menu_filter as the resource name and “Filter” as the resource value. Click OK to close the dialog and complete the configuration of this app bar item:
Unfortunately, at this point, Android Studio bugs crop up yet again, and we cannot readily add a checkable submenu to this item via drag-and-drop. So, switch to the “Code” view and add an empty <menu> element as a child of the filter <item> element:
  <item
    android:id="@+id/filter"
    android:icon="@drawable/ic_filter"
    android:title="@string/menu_filter"
    app:showAsAction="ifRoom|withText">
    <menu />
  </item>
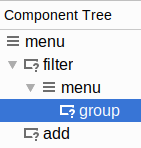
Then, switch back to the “Design” view. From the Palette, drag a “Group” into the new “menu” in the Component Tree:
In the Attributes pane, give the group an ID of filter_group and set the “checkableBehavior” to “single”.
Then, from the Palette, drag a “Menu Item” into the new group in the Component Tree:

Drag two more “Menu Item” entries from the “Palette” and drop them in the group in the Component Tree, to give you a total of three items in the group.
Select the first of the three submenu items in the Component Tree. In the Attributes pane, give it an ID of all. In the “All Attributes” section, check the “checked” checkbox, so that it contains a checkmark. Then, click the “O” button next to the “title” field. As before, this brings up a string resource selector. Click on “Add new resource” > “New string Value” in the drop-down towards the top. In the dialog, fill in menu_filter_all as the resource name and “All” as the resource value. Click OK to close the dialog and complete the configuration of this submenu item.
Select the second submenu item in the Component Tree. In the Attributes pane, give it an ID of completed. Then, for the “title”, use the “O” button to assign it a new string resource, named menu_filter_completed, with a value of “Completed”.
Select the third submenu item in the Component Tree. In the Attributes pane, give it an ID of outstanding. Then, for the “title”, use the “O” button to assign it a new string resource, named menu_filter_outstanding, with a value of “Outstanding”.
If you run your app, you should see the new filter app bar item. Clicking it will expose the submenu, although clicking on the submenu items will have no effect.

Prev Table of Contents Next
This book is licensed under the Creative Commons Attribution-ShareAlike 4.0 International license.