Step #5: Running the Stub Unit Test
You have a variety of ways to run the unit test. The simplest ones come from “run” icons in the gutter of the editor:

Functions that implement tests will have the @Test annotation. Clicking the run icon next to a test function will run just that test function. Clicking the run icon next to a class will run all of the test functions in that class.
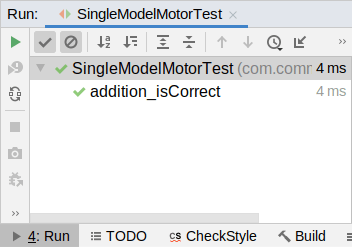
If you click the run icon next to SingleModelMotorTest, that class’ test functions will be run, and the “Run” tool window will open in Android Studio to show you the results:

Our test function uses an assertEquals() method supplied by JUnit. assertEquals() compares two values and fails the test if they are not equal.
Not surprisingly, 2 + 2 does indeed equal 4.
(if you were surprised by this, once again… surprise!)
The test output shows passing tests with a green checkmark, so we can see that our test passed. Also, at this point, the run icons in the editor become “run again” icons, with the green check-circle indicating that the previous test passed:

If you change the assertEquals() call to be assertEquals(5, 2 + 2) and run the test again, you will see that it fails:

The yellow icon indicates that the test failed due to a failed assertion.
If you change the assertEquals() call to be assertEquals(4, 2 / 0) and run the test again, you will see that the test fails again. This time, though, the test output uses a red icon, to indicate that our test crashed:

Usually, after a test failure, our editor icons turn red, indicating that the previous run of the test failed:

As we add more test functions, you may get a mix of results, with some tests succeeding and some tests failing. The test class is only considered to have succeeded if all of its test functions succeed.
Prev Table of Contents Next
This book is licensed under the Creative Commons Attribution-ShareAlike 4.0 International license.